If I have seen further, it is by standing on the shoulders of giants 如果我比别人看得更远,那是因为我站在巨人的肩膀上 如今回头看下Servlet不仅如此强大,还具有很强烈的参考意义,能在现如今流行的大部分框架中找到它的影子。下面文章不止与探索Servlet,可能在其中穿插其他的关联知识点,旨在能从此次的学习中获取更多的知识点参考资料总结,转化为自己的理解输出,在文中我尽量以截图+复制全限定类名的方式记录,以便感兴趣的再次查找。 Springboot与Servlet 在springboot中内嵌了Tomcat容器,而Tomcat又是Servlet的容器,Springboot就与Servlet产生了紧密的联系。
生命周期 1、初始化
应用上下文ServletContext 应用上下文即可看做:一次请求到达,到响应结束的过程中间的catlog,即阅读中结合上下文语境,是一个广义定义。
1 2 3 4 5 6 7 8 9 10 11 12 13 14 15 16 17 18 19 20 21 22 23 24 25 26 public class ApplicationContext implements ServletContext protected static final boolean STRICT_SERVLET_COMPLIANCE; protected static final boolean GET_RESOURCE_REQUIRE_SLASH; static { STRICT_SERVLET_COMPLIANCE = Globals.STRICT_SERVLET_COMPLIANCE; String requireSlash = System.getProperty("org.apache.catalina.core.ApplicationContext.GET_RESOURCE_REQUIRE_SLASH" ); if (requireSlash == null ) { GET_RESOURCE_REQUIRE_SLASH = STRICT_SERVLET_COMPLIANCE; } else { GET_RESOURCE_REQUIRE_SLASH = Boolean.parseBoolean(requireSlash); } }
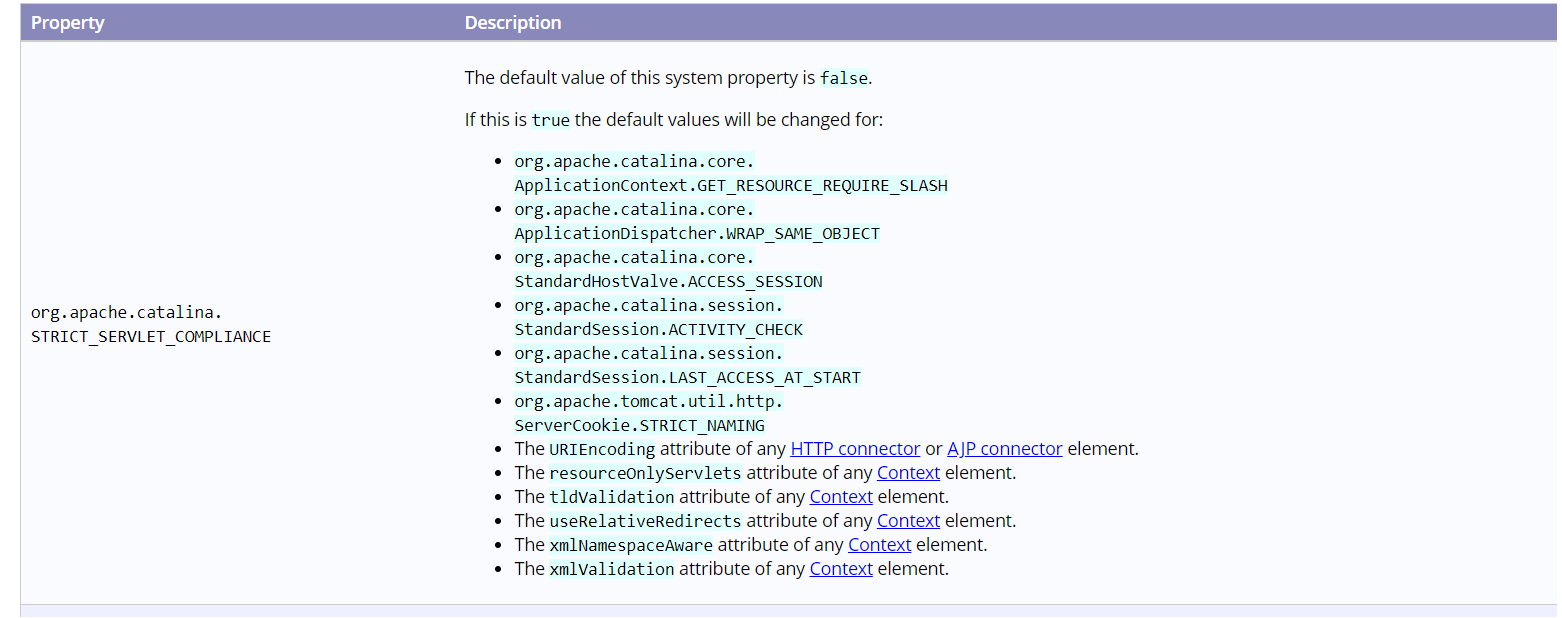
注:特别重要上述配置为tomcat中第一个开关配置,决定多个属性的值。来自于下面的Globals.STRICT_SERVLET_COMPLIANCE;默认为false
1 public static final boolean STRICT_SERVLET_COMPLIANCE =Boolean.parseBoolean(System.getProperty("org.apache.catalina.STRICT_SERVLET_COMPLIANCE" , "false" ));
和官网截图https://blog.csdn.net/xing930408/article/details/111225064 https://tomcat.apache.org/tomcat-8.5-doc/config/systemprops.html
SpringBoot ApplicationContext https://docs.spring.io/spring-framework/docs/current/javadoc-api/org/springframework/context/ApplicationContext.html
1 public interface ApplicationContext extends EnvironmentCapable, ListableBeanFactory, HierarchicalBeanFactory,MessageSource, ApplicationEventPublisher, ResourcePatternResolver
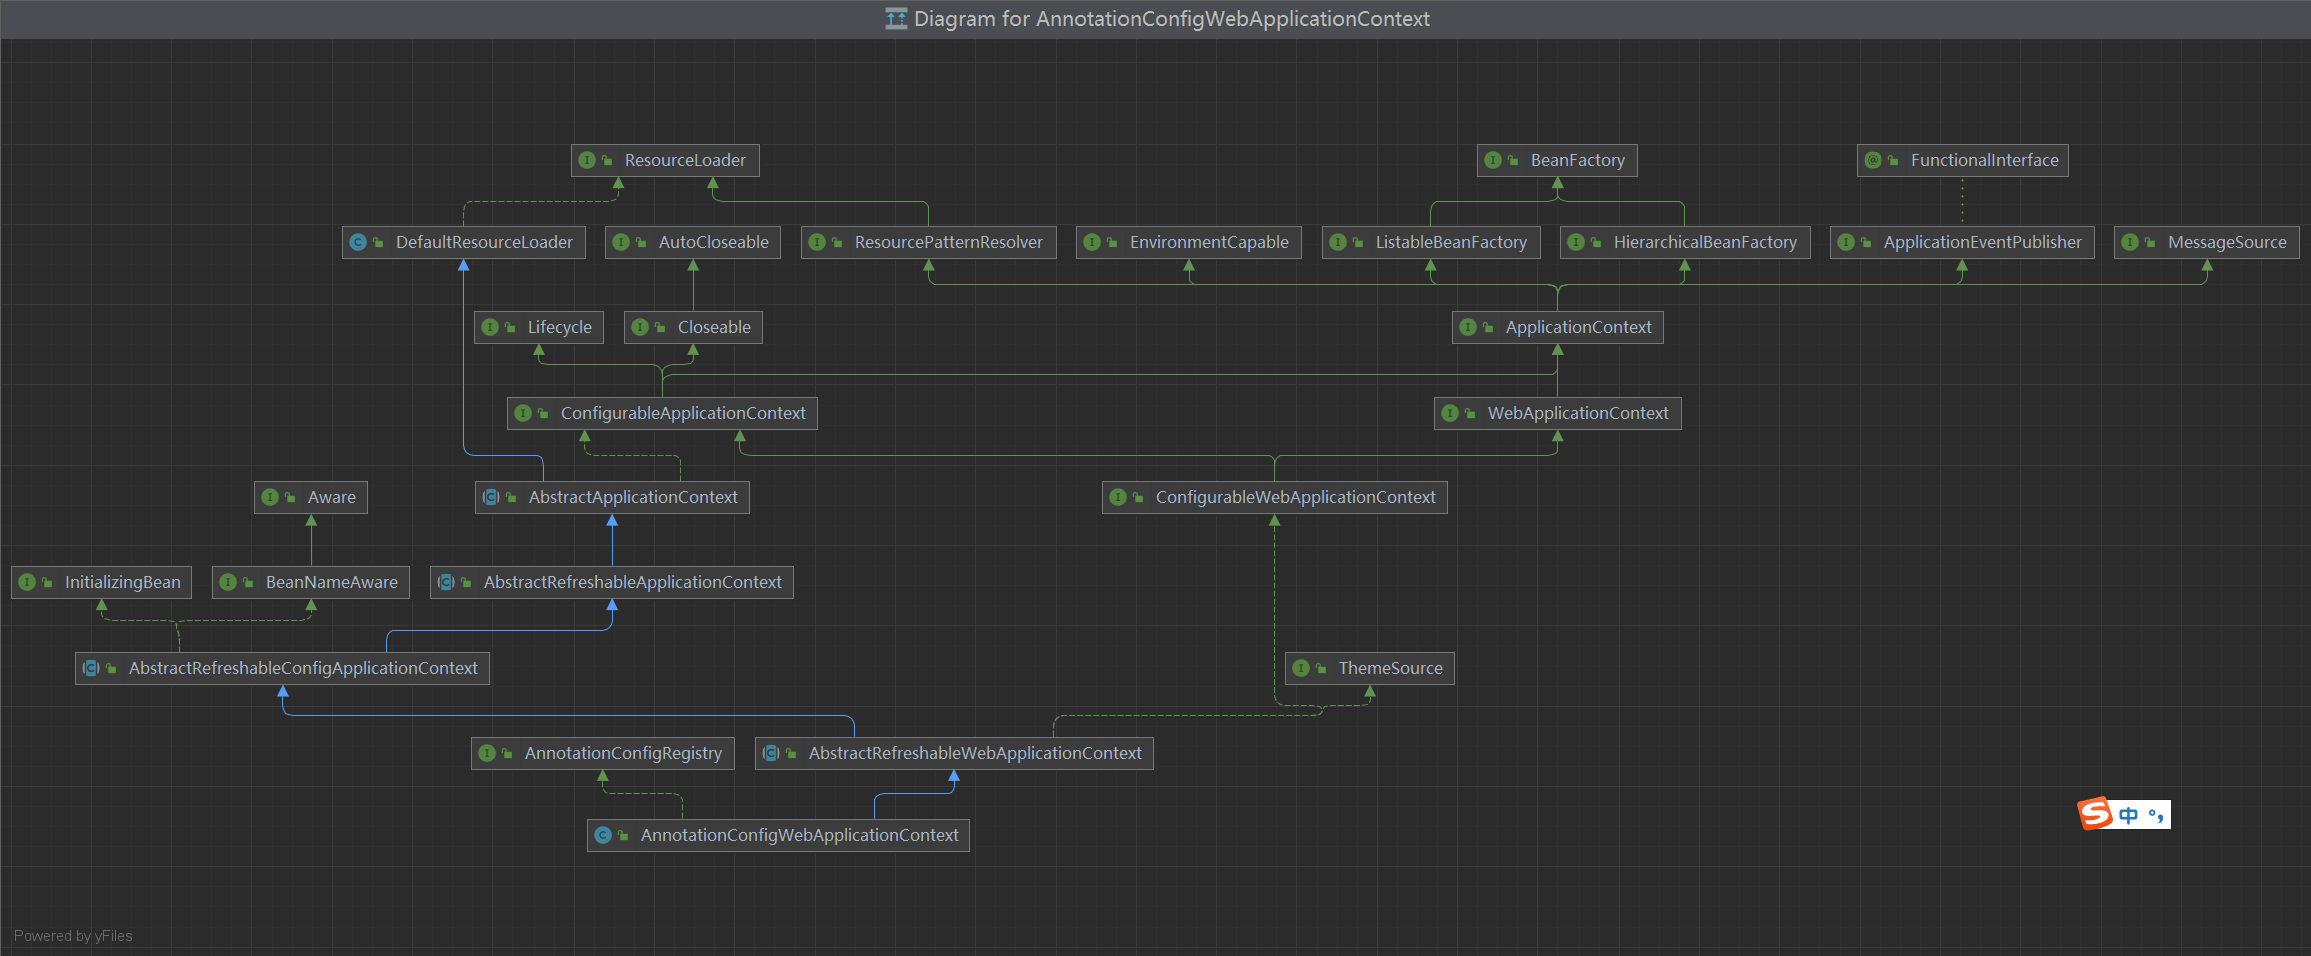
都在说ApplicationContext衍生了BeanFactory那么对此都扩展了那些功能?ApplicationContext定了高级容器的基本规范,其实他也不是直接继承BeanFactory基础容器,可以看到ApplicationContext的直接父接口对BeanFactory进行很多拓展其中就包括:
再比较ApplicationContext和ConfigurableApplicationContext定义的方法以及下图层级关系,ConfigurableApplicationContext是ApplicationContext的子接口,也就包含了ApplicationContext。通过方法可以知道,ConfigurableApplicationContext重在对各种属性的配置,而ApplicationContext接口主要各种属性的get方法。
Spring这种将get和set分开到两个接口的设计增大了属性设置和获取的灵活性,将两者分开也更加清晰。在以后的解决方案设计中,可以参考,将配置信息和获取信息分开,两者互不干扰,在保证重要的基础属性不变的情况,可以按需进行拓展。其实Spring的框架设计中应用了大量的装饰者模式,这也是高拓展点的需要
该类提供了高级IOC规范
从ListableBeanFactory接口继承来的:用于访问应用组件的工厂方法
从父应用上下文定义的在子上下文中将始终保持优先
https://www.javaguides.net/2019/10/how-to-get-application-context-in-spring-boot.html
1
2
3
4
5
6
7
8
9
10
11
12
13
14
15
16
17
18
19
20
21
22
23
24
25
26
27
28
29
30
31
32
33
34
35
36
37
38
39
40
41
public interface ApplicationContext extends EnvironmentCapable, ListableBeanFactory, HierarchicalBeanFactory, MessageSource, ApplicationEventPublisher, ResourcePatternResolver { /** * 返回一个唯一的应用上下文id+ * @return the unique id of the context, or {@code null} if none */ @Nullable String getId(); /** * 返回已经部署的该应用上下文的名称. * @return a name for the deployed application, or the empty String by default */ String getApplicationName(); /** * 返回此上下文友好的名称---这有什么用呢? * @return a display name for this context (never {@code null}) */ String getDisplayName(); /** * 返回该上下文第一次被加载的时间戳 * @return the timestamp (ms) when this context was first loaded */ long getStartupDate(); /** *返回父应用上下文, 如果没有父上下文,该上下文就是在上下文层次的根 * @return the parent context, or {@code null} if there is no parent */ @Nullable ApplicationContext getParent(); AutowireCapableBeanFactory getAutowireCapableBeanFactory() throws IllegalStateException; }
这其中对AutowireCapableBeanFactory getAutowireCapableBeanFactory()方法有疑惑,然后网上百度了一下。Spring提供了一种机制,能够为第三方框架赋能,让Spring去管理的Bean去装配和填充那些没有被SpringIOC管理的bean。也就是Spring提供了使用第三方框架的能力,能够做到无缝的将第三方框架整合到Spring中来进行使用,Junit与Quartz借用了这种机制为自己赋能。
————————————————https://blog.csdn.net/ligel136738/article/details/113533132
AutowireCapableBeanFactory 1 2 3 4 5 6 7 8 9 10 11 12 13 14 15 16 17 18 19 20 21 22 23 24 25 26 27 28 29 30 31 32 33 34 35 36 37 38 39 40 41 42 43 44 45 46 47 48 49 50 51 52 53 54 55 56 57 58 59 60 61 62 63 64 65 66 67 68 69 70 71 72 73 74 75 76 77 78 79 80 81 package org.springframework.beans.factory.config; import java.util.Set; import org.springframework.beans.BeansException; import org.springframework.beans.TypeConverter; import org.springframework.beans.factory.BeanFactory; import org.springframework.beans.factory.NoSuchBeanDefinitionException; import org.springframework.beans.factory.NoUniqueBeanDefinitionException; import org.springframework.lang.Nullable; public interface AutowireCapableBeanFactory extends BeanFactory { int AUTOWIRE_NO = 0; int AUTOWIRE_BY_NAME = 1; int AUTOWIRE_BY_TYPE = 2; int AUTOWIRE_CONSTRUCTOR = 3; @Deprecated int AUTOWIRE_AUTODETECT = 4; String ORIGINAL_INSTANCE_SUFFIX = ".ORIGINAL"; <T> T createBean(Class<T> beanClass) throws BeansException; void autowireBean(Object existingBean) throws BeansException; Object configureBean(Object existingBean, String beanName) throws BeansException; Object createBean(Class<?> beanClass, int autowireMode, boolean dependencyCheck) throws BeansException; Object autowire(Class<?> beanClass, int autowireMode, boolean dependencyCheck) throws BeansException; void autowireBeanProperties(Object existingBean, int autowireMode, boolean dependencyCheck) throws BeansException; void applyBeanPropertyValues(Object existingBean, String beanName) throws BeansException; Object initializeBean(Object existingBean, String beanName) throws BeansException; Object applyBeanPostProcessorsBeforeInitialization(Object existingBean, String beanName) throws BeansException; Object applyBeanPostProcessorsAfterInitialization(Object existingBean, String beanName) throws BeansException; void destroyBean(Object existingBean); <T> NamedBeanHolder<T> resolveNamedBean(Class<T> requiredType) throws BeansException; @Nullable Object resolveDependency(DependencyDescriptor descriptor, @Nullable String requestingBeanName) throws BeansException; @Nullable Object resolveDependency(DependencyDescriptor descriptor, @Nullable String requestingBeanName, @Nullable Set<String> autowiredBeanNames, @Nullable TypeConverter typeConverter) throws BeansException; }
在ApplacationContext中并没有实现此工厂接口,如上文可见,是在初始化Spring管理Bean之外的实例时直接调用getAutowireCapableBeanFactory方法
不自动注入:AUTOWIRE_NO
以AbstractAutowireCapableBeanFactory为例,其实现如下
1 2 3 4 5 6 7 8 9 10 11 12 13 14 15 16 17 18 19 20 @@Override public void autowireBean (Object existingBean) RootBeanDefinition bd = new RootBeanDefinition(ClassUtils.getUserClass(existingBean)); Bean的作用域 bd.setScope(BeanDefinition.SCOPE_PROTOTYPE); 检查给定类在给定上下文中是否是缓存安全的, 即它是由给定类加载器加载还是由其父级加载。类加载器 bd.allowCaching = ClassUtils.isCacheSafe(bd.getBeanClass(), getBeanClassLoader()); BeanWrapper bw = new BeanWrapperImpl(existingBean); 初始化BeanRapper并创建 initBeanWrapper(bw); 实际上该方法的逻辑主要是在populateBean中。这个方法是Spring中一个重要的方法。用于装配Bean。主要是通过反射获取到我们new 出来的对象的属性及注解,若是注解时Autowired、Value、Inject时,进行Bean组装。此方法执行完毕,我们new 出来的方法就可以通过注解注入的bean进行操作了 作者:小胖学编程 链接:https: 来源:简书 著作权归作者所有。商业转载请联系作者获得授权,非商业转载请注明出处。 populateBean(bd.getBeanClass().getName(), bd, bw); }
Spring容器内部工作机制AbstractApplicationContext
1 2 3 4 5 6 7 8 9 10 11 12 13 14 15 16 17 18 19 20 21 22 23 24 25 26 27 28 29 30 31 32 33 34 35 36 37 38 39 40 41 42 43 44 45 46 47 48 49 50 51 52 53 54 55 56 57 58 59 60 61 62 63 64 65 66 67 68 69 70 71 72 73 74 75 76 77 78 79 80 81 82 83 84 85 86 87 88 89 90 91 92 93 94 95 96 97 98 99 100 101 102 103 104 105 106 107 108 109 110 111 112 113 114 115 116 117 118 119 120 121 122 123 124 125 126 127 128 129 130 131 132 133 134 135 136 137 138 139 140 141 142 143 144 145 146 147 148 149 150 151 152 153 154 155 156 157 158 159 160 161 162 163 164 165 166 167 168 169 170 171 172 173 174 175 176 177 178 179 180 181 182 183 184 185 186 187 188 189 190 191 192 193 194 195 196 197 198 199 200 201 202 203 204 205 206 207 208 209 210 211 212 213 214 215 216 217 218 219 220 221 222 223 224 225 226 227 228 229 230 231 232 233 234 235 236 237 238 239 240 241 242 243 244 245 246 247 248 249 250 251 252 253 254 255 256 257 258 259 260 261 262 263 264 265 266 267 268 269 270 271 272 273 274 275 276 277 278 279 280 281 282 283 284 285 286 287 288 289 290 291 292 293 294 295 296 297 298 299 300 301 302 303 304 305 306 307 308 309 310 311 312 313 314 315 316 317 318 319 320 321 322 323 324 325 326 327 328 329 330 331 332 333 334 335 336 337 338 339 340 341 342 343 344 345 346 347 348 349 350 351 352 353 354 355 356 357 358 359 360 361 362 363 364 365 366 367 368 369 370 371 372 373 374 375 376 377 378 379 380 381 382 383 384 385 386 387 388 389 390 391 392 393 394 395 396 397 398 399 400 401 402 403 404 405 406 407 408 409 410 411 412 413 414 415 416 417 418 419 420 421 422 423 424 425 426 427 428 429 430 431 432 433 434 435 436 437 438 439 440 441 442 443 444 445 446 447 448 449 450 451 452 453 454 455 456 457 458 459 460 461 462 463 464 465 466 467 468 469 470 471 472 473 474 475 476 477 478 479 480 481 482 483 484 485 486 487 488 489 490 491 492 493 494 495 496 497 498 499 500 501 502 503 504 505 506 507 508 509 510 511 512 513 514 515 516 517 518 519 520 521 522 523 524 525 526 527 528 529 530 531 532 533 534 535 536 537 538 539 540 541 542 543 544 545 546 547 548 549 550 551 552 553 554 555 556 557 558 559 560 561 562 563 564 565 566 567 568 569 570 571 572 573 574 575 576 577 578 579 580 581 582 583 584 585 586 587 588 589 590 591 592 593 594 595 596 597 598 599 600 601 602 603 604 605 606 607 608 609 610 611 612 613 614 615 616 617 618 619 620 621 622 623 624 625 626 627 628 629 630 631 632 633 634 635 636 637 638 639 640 641 642 643 644 645 646 647 648 649 650 651 652 653 654 655 656 657 658 659 660 661 662 663 664 665 666 667 668 669 670 671 672 673 674 675 676 677 678 679 680 681 682 683 684 685 686 687 688 689 690 691 692 693 694 695 696 697 698 699 700 701 702 703 704 705 706 707 708 709 710 711 712 713 714 715 716 717 718 719 720 721 722 723 724 725 726 727 728 729 730 731 732 733 734 735 736 737 738 739 740 741 742 743 744 745 746 747 748 749 750 751 752 753 754 755 756 757 758 759 760 761 762 763 764 765 766 767 768 769 770 771 772 773 774 775 776 777 778 779 780 781 782 783 784 785 786 787 788 789 790 791 792 793 794 795 796 797 798 799 800 801 802 803 804 805 806 807 808 809 810 811 812 813 814 815 816 817 818 819 820 821 822 823 824 825 826 827 828 829 830 831 832 833 834 835 836 837 838 839 840 841 842 843 844 845 846 847 848 849 850 851 852 853 854 855 856 857 858 859 860 861 862 863 864 865 866 867 868 869 870 871 872 873 874 875 876 877 878 879 880 881 882 883 884 885 886 887 888 889 890 891 892 893 894 895 896 897 898 899 900 901 902 903 904 905 906 907 908 909 910 911 912 913 914 915 916 917 918 919 920 921 922 923 924 925 926 927 928 929 930 931 932 933 934 935 936 937 938 939 940 941 942 943 944 945 946 947 948 949 950 951 952 953 954 955 956 957 958 959 960 961 962 963 964 965 966 967 968 969 970 971 972 973 974 975 976 977 978 979 980 981 982 983 984 985 986 987 988 989 990 991 992 993 994 995 996 997 998 999 1000 1001 1002 1003 1004 1005 1006 1007 1008 1009 1010 1011 1012 1013 1014 1015 1016 1017 1018 1019 1020 1021 1022 1023 1024 1025 1026 1027 1028 1029 1030 1031 1032 1033 1034 1035 1036 1037 1038 1039 1040 1041 1042 1043 1044 1045 1046 1047 1048 1049 1050 1051 1052 1053 1054 1055 1056 1057 1058 1059 1060 1061 1062 1063 1064 1065 1066 1067 1068 1069 1070 1071 1072 1073 1074 1075 1076 1077 1078 1079 1080 1081 1082 1083 1084 1085 1086 1087 1088 1089 1090 1091 1092 1093 1094 1095 1096 1097 1098 1099 1100 1101 1102 1103 1104 1105 1106 1107 1108 1109 1110 1111 1112 1113 1114 1115 1116 1117 1118 1119 1120 1121 1122 1123 1124 1125 1126 1127 1128 1129 1130 1131 1132 1133 1134 1135 1136 1137 1138 1139 1140 1141 1142 1143 1144 1145 1146 1147 1148 1149 1150 1151 1152 1153 1154 1155 1156 1157 1158 1159 1160 1161 1162 1163 1164 1165 1166 1167 1168 1169 1170 1171 1172 1173 1174 1175 1176 1177 1178 1179 1180 1181 1182 1183 1184 1185 1186 1187 1188 1189 1190 1191 1192 1193 1194 1195 1196 1197 1198 1199 1200 1201 1202 1203 1204 1205 1206 1207 1208 1209 1210 1211 1212 org.springframework.context.support.AbstractApplicationContext package org.springframework.context.support;public abstract class AbstractApplicationContext extends DefaultResourceLoader implements ConfigurableApplicationContext { public static final String MESSAGE_SOURCE_BEAN_NAME = "messageSource" ; public static final String LIFECYCLE_PROCESSOR_BEAN_NAME = "lifecycleProcessor" ; public static final String APPLICATION_EVENT_MULTICASTER_BEAN_NAME = "applicationEventMulticaster" ; static { ContextClosedEvent.class.getName(); } protected final Log logger = LogFactory.getLog(getClass()); private String id = ObjectUtils.identityToString(this ); private String displayName = ObjectUtils.identityToString(this ); @Nullable private ApplicationContext parent; @Nullable private ConfigurableEnvironment environment; private final List<BeanFactoryPostProcessor> beanFactoryPostProcessors = new ArrayList<>(); private long startupDate; private final AtomicBoolean active = new AtomicBoolean(); private final AtomicBoolean closed = new AtomicBoolean(); private final Object startupShutdownMonitor = new Object(); @Nullable private Thread shutdownHook; private ResourcePatternResolver resourcePatternResolver; @Nullable private LifecycleProcessor lifecycleProcessor; @Nullable private MessageSource messageSource; @Nullable private ApplicationEventMulticaster applicationEventMulticaster; private final Set<ApplicationListener<?>> applicationListeners = new LinkedHashSet<>(); @Nullable private Set<ApplicationEvent> earlyApplicationEvents; public AbstractApplicationContext () this .resourcePatternResolver = getResourcePatternResolver(); } public AbstractApplicationContext (@Nullable ApplicationContext parent) this (); setParent(parent); } @Override public void setId (String id) this .id = id; } @Override public String getId () return this .id; } @Override public String getApplicationName () return "" ; } public void setDisplayName (String displayName) Assert.hasLength(displayName, "Display name must not be empty" ); this .displayName = displayName; } @Override public String getDisplayName () return this .displayName; } @Override @Nullable public ApplicationContext getParent () return this .parent; } @Override public void setEnvironment (ConfigurableEnvironment environment) this .environment = environment; } @Override public ConfigurableEnvironment getEnvironment () if (this .environment == null ) { this .environment = createEnvironment(); } return this .environment; } protected ConfigurableEnvironment createEnvironment () return new StandardEnvironment(); } @Override public AutowireCapableBeanFactory getAutowireCapableBeanFactory () throws IllegalStateException return getBeanFactory(); } @Override public long getStartupDate () return this .startupDate; } @Override public void publishEvent (ApplicationEvent event) publishEvent(event, null ); } @Override public void publishEvent (Object event) publishEvent(event, null ); } protected void publishEvent (Object event, @Nullable ResolvableType eventType) Assert.notNull(event, "Event must not be null" ); ApplicationEvent applicationEvent; if (event instanceof ApplicationEvent) { applicationEvent = (ApplicationEvent) event; } else { applicationEvent = new PayloadApplicationEvent<>(this , event); if (eventType == null ) { eventType = ((PayloadApplicationEvent) applicationEvent).getResolvableType(); } } if (this .earlyApplicationEvents != null ) { this .earlyApplicationEvents.add(applicationEvent); } else { getApplicationEventMulticaster().multicastEvent(applicationEvent, eventType); } if (this .parent != null ) { if (this .parent instanceof AbstractApplicationContext) { ((AbstractApplicationContext) this .parent).publishEvent(event, eventType); } else { this .parent.publishEvent(event); } } } ApplicationEventMulticaster getApplicationEventMulticaster () throws IllegalStateException { if (this .applicationEventMulticaster == null ) { throw new IllegalStateException("ApplicationEventMulticaster not initialized - " + "call 'refresh' before multicasting events via the context: " + this ); } return this .applicationEventMulticaster; } LifecycleProcessor getLifecycleProcessor () throws IllegalStateException { if (this .lifecycleProcessor == null ) { throw new IllegalStateException("LifecycleProcessor not initialized - " + "call 'refresh' before invoking lifecycle methods via the context: " + this ); } return this .lifecycleProcessor; } protected ResourcePatternResolver getResourcePatternResolver () return new PathMatchingResourcePatternResolver(this ); } @Override public void setParent (@Nullable ApplicationContext parent) this .parent = parent; if (parent != null ) { Environment parentEnvironment = parent.getEnvironment(); if (parentEnvironment instanceof ConfigurableEnvironment) { getEnvironment().merge((ConfigurableEnvironment) parentEnvironment); } } } @Override public void addBeanFactoryPostProcessor (BeanFactoryPostProcessor postProcessor) Assert.notNull(postProcessor, "BeanFactoryPostProcessor must not be null" ); this .beanFactoryPostProcessors.add(postProcessor); } public List<BeanFactoryPostProcessor> getBeanFactoryPostProcessors () return this .beanFactoryPostProcessors; } @Override public void addApplicationListener (ApplicationListener<?> listener) Assert.notNull(listener, "ApplicationListener must not be null" ); if (this .applicationEventMulticaster != null ) { this .applicationEventMulticaster.addApplicationListener(listener); } this .applicationListeners.add(listener); } public Collection<ApplicationListener<?>> getApplicationListeners() { return this .applicationListeners; } @Override public void refresh () throws BeansException, IllegalStateException synchronized (this .startupShutdownMonitor) { prepareRefresh(); ConfigurableListableBeanFactory beanFactory = obtainFreshBeanFactory(); prepareBeanFactory(beanFactory); try { postProcessBeanFactory(beanFactory); invokeBeanFactoryPostProcessors(beanFactory); registerBeanPostProcessors(beanFactory); initMessageSource(); initApplicationEventMulticaster(); onRefresh(); registerListeners(); finishBeanFactoryInitialization(beanFactory); finishRefresh(); } catch (BeansException ex) { if (logger.isWarnEnabled()) { logger.warn("Exception encountered during context initialization - " + "cancelling refresh attempt: " + ex); } destroyBeans(); cancelRefresh(ex); throw ex; } finally { resetCommonCaches(); } } } protected void prepareRefresh () this .startupDate = System.currentTimeMillis(); this .closed.set(false ); this .active.set(true ); if (logger.isDebugEnabled()) { if (logger.isTraceEnabled()) { logger.trace("Refreshing " + this ); } else { logger.debug("Refreshing " + getDisplayName()); } } initPropertySources(); getEnvironment().validateRequiredProperties(); this .earlyApplicationEvents = new LinkedHashSet<>(); } protected void initPropertySources () } protected ConfigurableListableBeanFactory obtainFreshBeanFactory () refreshBeanFactory(); return getBeanFactory(); } protected void prepareBeanFactory (ConfigurableListableBeanFactory beanFactory) beanFactory.setBeanClassLoader(getClassLoader()); beanFactory.setBeanExpressionResolver(new StandardBeanExpressionResolver(beanFactory.getBeanClassLoader())); beanFactory.addPropertyEditorRegistrar(new ResourceEditorRegistrar(this , getEnvironment())); beanFactory.addBeanPostProcessor(new ApplicationContextAwareProcessor(this )); beanFactory.ignoreDependencyInterface(EnvironmentAware.class); beanFactory.ignoreDependencyInterface(EmbeddedValueResolverAware.class); beanFactory.ignoreDependencyInterface(ResourceLoaderAware.class); beanFactory.ignoreDependencyInterface(ApplicationEventPublisherAware.class); beanFactory.ignoreDependencyInterface(MessageSourceAware.class); beanFactory.ignoreDependencyInterface(ApplicationContextAware.class); beanFactory.registerResolvableDependency(BeanFactory.class, beanFactory); beanFactory.registerResolvableDependency(ResourceLoader.class, this ); beanFactory.registerResolvableDependency(ApplicationEventPublisher.class, this ); beanFactory.registerResolvableDependency(ApplicationContext.class, this ); beanFactory.addBeanPostProcessor(new ApplicationListenerDetector(this )); if (beanFactory.containsBean(LOAD_TIME_WEAVER_BEAN_NAME)) { beanFactory.addBeanPostProcessor(new LoadTimeWeaverAwareProcessor(beanFactory)); beanFactory.setTempClassLoader(new ContextTypeMatchClassLoader(beanFactory.getBeanClassLoader())); } if (!beanFactory.containsLocalBean(ENVIRONMENT_BEAN_NAME)) { beanFactory.registerSingleton(ENVIRONMENT_BEAN_NAME, getEnvironment()); } if (!beanFactory.containsLocalBean(SYSTEM_PROPERTIES_BEAN_NAME)) { beanFactory.registerSingleton(SYSTEM_PROPERTIES_BEAN_NAME, getEnvironment().getSystemProperties()); } if (!beanFactory.containsLocalBean(SYSTEM_ENVIRONMENT_BEAN_NAME)) { beanFactory.registerSingleton(SYSTEM_ENVIRONMENT_BEAN_NAME, getEnvironment().getSystemEnvironment()); } } protected void postProcessBeanFactory (ConfigurableListableBeanFactory beanFactory) } protected void invokeBeanFactoryPostProcessors (ConfigurableListableBeanFactory beanFactory) PostProcessorRegistrationDelegate.invokeBeanFactoryPostProcessors(beanFactory, getBeanFactoryPostProcessors()); if (beanFactory.getTempClassLoader() == null && beanFactory.containsBean(LOAD_TIME_WEAVER_BEAN_NAME)) { beanFactory.addBeanPostProcessor(new LoadTimeWeaverAwareProcessor(beanFactory)); beanFactory.setTempClassLoader(new ContextTypeMatchClassLoader(beanFactory.getBeanClassLoader())); } } protected void registerBeanPostProcessors (ConfigurableListableBeanFactory beanFactory) PostProcessorRegistrationDelegate.registerBeanPostProcessors(beanFactory, this ); } protected void initMessageSource () ConfigurableListableBeanFactory beanFactory = getBeanFactory(); if (beanFactory.containsLocalBean(MESSAGE_SOURCE_BEAN_NAME)) { this .messageSource = beanFactory.getBean(MESSAGE_SOURCE_BEAN_NAME, MessageSource.class); if (this .parent != null && this .messageSource instanceof HierarchicalMessageSource) { HierarchicalMessageSource hms = (HierarchicalMessageSource) this .messageSource; if (hms.getParentMessageSource() == null ) { hms.setParentMessageSource(getInternalParentMessageSource()); } } if (logger.isTraceEnabled()) { logger.trace("Using MessageSource [" + this .messageSource + "]" ); } } else { DelegatingMessageSource dms = new DelegatingMessageSource(); dms.setParentMessageSource(getInternalParentMessageSource()); this .messageSource = dms; beanFactory.registerSingleton(MESSAGE_SOURCE_BEAN_NAME, this .messageSource); if (logger.isTraceEnabled()) { logger.trace("No '" + MESSAGE_SOURCE_BEAN_NAME + "' bean, using [" + this .messageSource + "]" ); } } } protected void initApplicationEventMulticaster () ConfigurableListableBeanFactory beanFactory = getBeanFactory(); if (beanFactory.containsLocalBean(APPLICATION_EVENT_MULTICASTER_BEAN_NAME)) { this .applicationEventMulticaster = beanFactory.getBean(APPLICATION_EVENT_MULTICASTER_BEAN_NAME, ApplicationEventMulticaster.class); if (logger.isTraceEnabled()) { logger.trace("Using ApplicationEventMulticaster [" + this .applicationEventMulticaster + "]" ); } } else { this .applicationEventMulticaster = new SimpleApplicationEventMulticaster(beanFactory); beanFactory.registerSingleton(APPLICATION_EVENT_MULTICASTER_BEAN_NAME, this .applicationEventMulticaster); if (logger.isTraceEnabled()) { logger.trace("No '" + APPLICATION_EVENT_MULTICASTER_BEAN_NAME + "' bean, using " + "[" + this .applicationEventMulticaster.getClass().getSimpleName() + "]" ); } } } protected void initLifecycleProcessor () ConfigurableListableBeanFactory beanFactory = getBeanFactory(); if (beanFactory.containsLocalBean(LIFECYCLE_PROCESSOR_BEAN_NAME)) { this .lifecycleProcessor = beanFactory.getBean(LIFECYCLE_PROCESSOR_BEAN_NAME, LifecycleProcessor.class); if (logger.isTraceEnabled()) { logger.trace("Using LifecycleProcessor [" + this .lifecycleProcessor + "]" ); } } else { DefaultLifecycleProcessor defaultProcessor = new DefaultLifecycleProcessor(); defaultProcessor.setBeanFactory(beanFactory); this .lifecycleProcessor = defaultProcessor; beanFactory.registerSingleton(LIFECYCLE_PROCESSOR_BEAN_NAME, this .lifecycleProcessor); if (logger.isTraceEnabled()) { logger.trace("No '" + LIFECYCLE_PROCESSOR_BEAN_NAME + "' bean, using " + "[" + this .lifecycleProcessor.getClass().getSimpleName() + "]" ); } } } protected void onRefresh () throws BeansException } protected void registerListeners () for (ApplicationListener<?> listener : getApplicationListeners()) { getApplicationEventMulticaster().addApplicationListener(listener); } String[] listenerBeanNames = getBeanNamesForType(ApplicationListener.class, true , false ); for (String listenerBeanName : listenerBeanNames) { getApplicationEventMulticaster().addApplicationListenerBean(listenerBeanName); } Set<ApplicationEvent> earlyEventsToProcess = this .earlyApplicationEvents; this .earlyApplicationEvents = null ; if (earlyEventsToProcess != null ) { for (ApplicationEvent earlyEvent : earlyEventsToProcess) { getApplicationEventMulticaster().multicastEvent(earlyEvent); } } } protected void finishBeanFactoryInitialization (ConfigurableListableBeanFactory beanFactory) if (beanFactory.containsBean(CONVERSION_SERVICE_BEAN_NAME) && beanFactory.isTypeMatch(CONVERSION_SERVICE_BEAN_NAME, ConversionService.class)) { beanFactory.setConversionService( beanFactory.getBean(CONVERSION_SERVICE_BEAN_NAME, ConversionService.class)); } if (!beanFactory.hasEmbeddedValueResolver()) { beanFactory.addEmbeddedValueResolver(strVal -> getEnvironment().resolvePlaceholders(strVal)); } String[] weaverAwareNames = beanFactory.getBeanNamesForType(LoadTimeWeaverAware.class, false , false ); for (String weaverAwareName : weaverAwareNames) { getBean(weaverAwareName); } beanFactory.setTempClassLoader(null ); beanFactory.freezeConfiguration(); beanFactory.preInstantiateSingletons(); } protected void finishRefresh () clearResourceCaches(); initLifecycleProcessor(); getLifecycleProcessor().onRefresh(); publishEvent(new ContextRefreshedEvent(this )); LiveBeansView.registerApplicationContext(this ); } protected void cancelRefresh (BeansException ex) this .active.set(false ); } protected void resetCommonCaches () ReflectionUtils.clearCache(); AnnotationUtils.clearCache(); ResolvableType.clearCache(); CachedIntrospectionResults.clearClassLoader(getClassLoader()); } @Override public void registerShutdownHook () if (this .shutdownHook == null ) { this .shutdownHook = new Thread() { @Override public void run () synchronized (startupShutdownMonitor) { doClose(); } } }; Runtime.getRuntime().addShutdownHook(this .shutdownHook); } } @Deprecated public void destroy () close(); } @Override public void close () synchronized (this .startupShutdownMonitor) { doClose(); if (this .shutdownHook != null ) { try { Runtime.getRuntime().removeShutdownHook(this .shutdownHook); } catch (IllegalStateException ex) { } } } } protected void doClose () if (this .active.get() && this .closed.compareAndSet(false , true )) { if (logger.isDebugEnabled()) { logger.debug("Closing " + this ); } LiveBeansView.unregisterApplicationContext(this ); try { publishEvent(new ContextClosedEvent(this )); } catch (Throwable ex) { logger.warn("Exception thrown from ApplicationListener handling ContextClosedEvent" , ex); } if (this .lifecycleProcessor != null ) { try { this .lifecycleProcessor.onClose(); } catch (Throwable ex) { logger.warn("Exception thrown from LifecycleProcessor on context close" , ex); } } destroyBeans(); closeBeanFactory(); onClose(); this .active.set(false ); } } protected void destroyBeans () getBeanFactory().destroySingletons(); } protected void onClose () } @Override public boolean isActive () return this .active.get(); } protected void assertBeanFactoryActive () if (!this .active.get()) { if (this .closed.get()) { throw new IllegalStateException(getDisplayName() + " has been closed already" ); } else { throw new IllegalStateException(getDisplayName() + " has not been refreshed yet" ); } } } @Override public Object getBean (String name) throws BeansException assertBeanFactoryActive(); return getBeanFactory().getBean(name); } @Override public <T> T getBean (String name, Class<T> requiredType) throws BeansException { assertBeanFactoryActive(); return getBeanFactory().getBean(name, requiredType); } @Override public Object getBean (String name, Object... args) throws BeansException assertBeanFactoryActive(); return getBeanFactory().getBean(name, args); } @Override public <T> T getBean (Class<T> requiredType) throws BeansException { assertBeanFactoryActive(); return getBeanFactory().getBean(requiredType); } @Override public <T> T getBean (Class<T> requiredType, Object... args) throws BeansException { assertBeanFactoryActive(); return getBeanFactory().getBean(requiredType, args); } @Override public <T> ObjectProvider<T> getBeanProvider (Class<T> requiredType) { assertBeanFactoryActive(); return getBeanFactory().getBeanProvider(requiredType); } @Override public <T> ObjectProvider<T> getBeanProvider (ResolvableType requiredType) { assertBeanFactoryActive(); return getBeanFactory().getBeanProvider(requiredType); } @Override public boolean containsBean (String name) return getBeanFactory().containsBean(name); } @Override public boolean isSingleton (String name) throws NoSuchBeanDefinitionException assertBeanFactoryActive(); return getBeanFactory().isSingleton(name); } @Override public boolean isPrototype (String name) throws NoSuchBeanDefinitionException assertBeanFactoryActive(); return getBeanFactory().isPrototype(name); } @Override public boolean isTypeMatch (String name, ResolvableType typeToMatch) throws NoSuchBeanDefinitionException assertBeanFactoryActive(); return getBeanFactory().isTypeMatch(name, typeToMatch); } @Override public boolean isTypeMatch (String name, Class<?> typeToMatch) throws NoSuchBeanDefinitionException assertBeanFactoryActive(); return getBeanFactory().isTypeMatch(name, typeToMatch); } @Override @Nullable public Class<?> getType(String name) throws NoSuchBeanDefinitionException { assertBeanFactoryActive(); return getBeanFactory().getType(name); } @Override public String[] getAliases(String name) { return getBeanFactory().getAliases(name); } @Override public boolean containsBeanDefinition (String beanName) return getBeanFactory().containsBeanDefinition(beanName); } @Override public int getBeanDefinitionCount () return getBeanFactory().getBeanDefinitionCount(); } @Override public String[] getBeanDefinitionNames() { return getBeanFactory().getBeanDefinitionNames(); } @Override public String[] getBeanNamesForType(ResolvableType type) { assertBeanFactoryActive(); return getBeanFactory().getBeanNamesForType(type); } @Override public String[] getBeanNamesForType(@Nullable Class<?> type) { assertBeanFactoryActive(); return getBeanFactory().getBeanNamesForType(type); } @Override public String[] getBeanNamesForType(@Nullable Class<?> type, boolean includeNonSingletons, boolean allowEagerInit) { assertBeanFactoryActive(); return getBeanFactory().getBeanNamesForType(type, includeNonSingletons, allowEagerInit); } @Override public <T> Map<String, T> getBeansOfType (@Nullable Class<T> type) throws BeansException { assertBeanFactoryActive(); return getBeanFactory().getBeansOfType(type); } @Override public <T> Map<String, T> getBeansOfType (@Nullable Class<T> type, boolean includeNonSingletons, boolean allowEagerInit) throws BeansException { assertBeanFactoryActive(); return getBeanFactory().getBeansOfType(type, includeNonSingletons, allowEagerInit); } @Override public String[] getBeanNamesForAnnotation(Class<? extends Annotation> annotationType) { assertBeanFactoryActive(); return getBeanFactory().getBeanNamesForAnnotation(annotationType); } @Override public Map<String, Object> getBeansWithAnnotation (Class<? extends Annotation> annotationType) throws BeansException { assertBeanFactoryActive(); return getBeanFactory().getBeansWithAnnotation(annotationType); } @Override @Nullable public <A extends Annotation> A findAnnotationOnBean (String beanName, Class<A> annotationType) throws NoSuchBeanDefinitionException { assertBeanFactoryActive(); return getBeanFactory().findAnnotationOnBean(beanName, annotationType); } @Override @Nullable public BeanFactory getParentBeanFactory () return getParent(); } @Override public boolean containsLocalBean (String name) return getBeanFactory().containsLocalBean(name); } @Nullable protected BeanFactory getInternalParentBeanFactory () return (getParent() instanceof ConfigurableApplicationContext ? ((ConfigurableApplicationContext) getParent()).getBeanFactory() : getParent()); } @Override public String getMessage (String code, @Nullable Object[] args, @Nullable String defaultMessage, Locale locale) return getMessageSource().getMessage(code, args, defaultMessage, locale); } @Override public String getMessage (String code, @Nullable Object[] args, Locale locale) throws NoSuchMessageException return getMessageSource().getMessage(code, args, locale); } @Override public String getMessage (MessageSourceResolvable resolvable, Locale locale) throws NoSuchMessageException return getMessageSource().getMessage(resolvable, locale); } private MessageSource getMessageSource () throws IllegalStateException if (this .messageSource == null ) { throw new IllegalStateException("MessageSource not initialized - " + "call 'refresh' before accessing messages via the context: " + this ); } return this .messageSource; } @Nullable protected MessageSource getInternalParentMessageSource () return (getParent() instanceof AbstractApplicationContext ? ((AbstractApplicationContext) getParent()).messageSource : getParent()); } @Override public Resource[] getResources(String locationPattern) throws IOException { return this .resourcePatternResolver.getResources(locationPattern); } @Override public void start () getLifecycleProcessor().start(); publishEvent(new ContextStartedEvent(this )); } @Override public void stop () getLifecycleProcessor().stop(); publishEvent(new ContextStoppedEvent(this )); } @Override public boolean isRunning () return (this .lifecycleProcessor != null && this .lifecycleProcessor.isRunning()); } protected abstract void refreshBeanFactory () throws BeansException, IllegalStateException protected abstract void closeBeanFactory () @Override public abstract ConfigurableListableBeanFactory getBeanFactory () throws IllegalStateException @Override public String toString () StringBuilder sb = new StringBuilder(getDisplayName()); sb.append(", started on " ).append(new Date(getStartupDate())); ApplicationContext parent = getParent(); if (parent != null ) { sb.append(", parent: " ).append(parent.getDisplayName()); } return sb.toString(); }
getBeansWithAnnotation方法实例: XXLJOB实际使用注解使用@JobHandler标识是一个job handler,当XXLJOB在执行AOP方法时,扫描注解执行handle方法
1 2 3 4 5 6 7 @Around("pointcut()") public Object handle (ProceedingJoinPoint joinPoint) throws Throwable MDC.put(RequestUtil.REQUEST_TRACEID, RequestUtil.getRequestId()); Object result= joinPoint.proceed(); MDC.clear(); return result; }
再执行Executor加载jobhandler时执行IJobHandler newJobHandler = XxlJobExecutor.loadJobHandler(triggerParam.getExecutorHandler());调佣start方法初始化
1 2 3 4 5 6 7 8 9 10 11 12 13 14 15 16 17 18 19 20 21 22 23 24 25 26 27 28 29 30 31 32 33 34 35 36 37 38 39 @Override public void start () throws Exception initJobHandlerRepository(applicationContext); GlueFactory.refreshInstance(1 ); super .start(); } private void initJobHandlerRepository (ApplicationContext applicationContext) if (applicationContext == null ) { return ; } Map<String, Object> serviceBeanMap = applicationContext.getBeansWithAnnotation(JobHandler.class); if (serviceBeanMap!=null && serviceBeanMap.size()>0 ) { for (Object serviceBean : serviceBeanMap.values()) { if (serviceBean instanceof IJobHandler){ String name = serviceBean.getClass().getAnnotation(JobHandler.class).value(); IJobHandler handler = (IJobHandler) serviceBean; if (loadJobHandler(name) != null ) { throw new RuntimeException("xxl-job jobhandler naming conflicts." ); } registJobHandler(name, handler); } } } } 初始化动作 Map<String, Object> serviceBeanMap = applicationContext.getBeansWithAnnotation(JobHandler.class);
AnnotationConfigWebApplicationContext
1 2 3 4 5 6 7 8 9 10 11 12 13 14 15 16 17 18 19 20 21 22 23 24 25 26 27 28 29 30 31 32 33 34 35 36 37 38 39 40 41 42 43 44 45 46 47 48 49 50 51 52 53 54 55 56 57 58 59 60 61 62 @Override protected void loadBeanDefinitions(DefaultListableBeanFactory beanFactory) { //加载Bean AnnotatedBeanDefinitionReader reader = getAnnotatedBeanDefinitionReader(beanFactory); //扫描注解 ClassPathBeanDefinitionScanner scanner = getClassPathBeanDefinitionScanner(beanFactory); //装配Bean BeanNameGenerator beanNameGenerator = getBeanNameGenerator(); if (beanNameGenerator != null) { reader.setBeanNameGenerator(beanNameGenerator); scanner.setBeanNameGenerator(beanNameGenerator); //注册Bean beanFactory.registerSingleton(AnnotationConfigUtils.CONFIGURATION_BEAN_NAME_GENERATOR, beanNameGenerator); } ScopeMetadataResolver scopeMetadataResolver = getScopeMetadataResolver(); if (scopeMetadataResolver != null) { reader.setScopeMetadataResolver(scopeMetadataResolver); scanner.setScopeMetadataResolver(scopeMetadataResolver); } if (!this.annotatedClasses.isEmpty()) { if (logger.isDebugEnabled()) { logger.debug("Registering annotated classes: [" + StringUtils.collectionToCommaDelimitedString(this.annotatedClasses) + "]"); } //注册Bean reader.register(ClassUtils.toClassArray(this.annotatedClasses)); } if (!this.basePackages.isEmpty()) { if (logger.isDebugEnabled()) { logger.debug("Scanning base packages: [" + StringUtils.collectionToCommaDelimitedString(this.basePackages) + "]"); } //扫描指定基包 scanner.scan(StringUtils.toStringArray(this.basePackages)); } String[] configLocations = getConfigLocations(); if (configLocations != null) { for (String configLocation : configLocations) { try { Class<?> clazz = ClassUtils.forName(configLocation, getClassLoader()); if (logger.isTraceEnabled()) { logger.trace("Registering [" + configLocation + "]"); } reader.register(clazz); } catch (ClassNotFoundException ex) { if (logger.isTraceEnabled()) { logger.trace("Could not load class for config location [" + configLocation + "] - trying package scan. " + ex); } int count = scanner.scan(configLocation); if (count == 0 && logger.isDebugEnabled()) { logger.debug("No annotated classes found for specified class/package [" + configLocation + "]"); } } } } }
BeanPostProcessor(后置处理器) 1 2 3 4 5 6 7 8 9 10 11 12 13 public interface BeanPostProcessor @Nullable default Object postProcessBeforeInitialization (Object bean, String beanName) throws BeansException return bean; } @Nullable default Object postProcessAfterInitialization (Object bean, String beanName) throws BeansException return bean; } }
在上面的context中随处可见对BeanPostProcessor的方法调用,用于检查标记接口或用代理封装,在Bean对象在实例化和依赖注入完毕后调用,第三方扩展功能均会实现此接口,在Bean的初始化时,通过InitializingBean来调用afterPropertiesSet方法。
ApplicationContextAware 在某些特殊的情况下,Bean需要实现某个功能,但该功能必须借助于Spring容器才能实现,此时就必须让该Bean先获取Spring容器,然后借助于Spring容器实现该功能。为了让Bean获取它所在的Spring容器,可以让该Bean实现ApplicationContextAware接口。ApplicationContextAware 通过它Spring容器会自动把上下文环境对象调用ApplicationContextAware接口中的setApplicationContext方法。在ApplicationContextAware的实现类中,就可以通过这个上下文环境对象得到Spring容器中的Bean。看到—Aware就知道是干什么的了,就是属性注入的,但是这个ApplicationContextAware的不同地方在于,实现了这个接口的bean,当spring容器初始化的时候,会自动的将ApplicationContext注入进来。
1 2 3 4 5 6 7 8 9 10 11 12 13 14 15 16 17 18 19 20 21 22 23 24 25 26 27 28 public interface ApplicationContextAware extends Aware void setApplicationContext (ApplicationContext applicationContext) throws BeansException } @Component public class SpringContextUtil implements ApplicationContextAware private static ApplicationContext applicationContext; @Override public void setApplicationContext (ApplicationContext context) throws BeansException applicationContext = context; } public static ApplicationContext getApplicationContext () return applicationContext; } public static <T> T getBean (Class<T> requiredType) { return getApplicationContext().getBean(requiredType); } public static <T> T getBean (String name) { return (T) getApplicationContext().getBean(name); } }
ResourceLoaderAware ResourceLoaderAware是特殊的标记接口,它希望拥有一个ResourceLoader 引用的对象。
1 2 3 public interface ResourceLoaderAware void setResourceLoader (ResourceLoader resourceLoader) }
当实现了 ResourceLoaderAware接口的类部署到application context(比如受Spring管理的bean)中时,它会被application context识别为 ResourceLoaderAware。 接着application context会调用setResourceLoader(ResourceLoader)方法,并把自身作为参数传入该方法(记住,所有Spring里的application context都实现了ResourceLoader接口)。
既然 ApplicationContext 就是ResourceLoader,那么该bean就可以实现 ApplicationContextAware接口并直接使用所提供的application context来载入资源,但是通常更适合使用特定的满足所有需要的 ResourceLoader实现。 这样一来,代码只需要依赖于可以看作辅助接口的资源载入接口,而不用依赖于整个Spring ApplicationContext 接口。
从Spring 2.5开始, 你可以使用ResourceLoader 的自动装配来代替实现 ResourceLoaderAware 接口。“传统的” constructor及 byType的自动装配模式 (第 3.3.5 节 “自动装配(autowire)协作者”已有论述)现在可以分别为构造方法参数及setter方法参数提供 ResourceLoader 类型的依赖。请使用新式的基于注解的自动装配特性以提供更大的灵活性(包括装配属性及多个方法参数的能力)。在这种情况下,只要属性、构造方法或者方法被 @Autowired注解修饰,ResourceLoader 就会被装配到需要ResourceLoader类型的属性、构造方法参数或者方法参数中
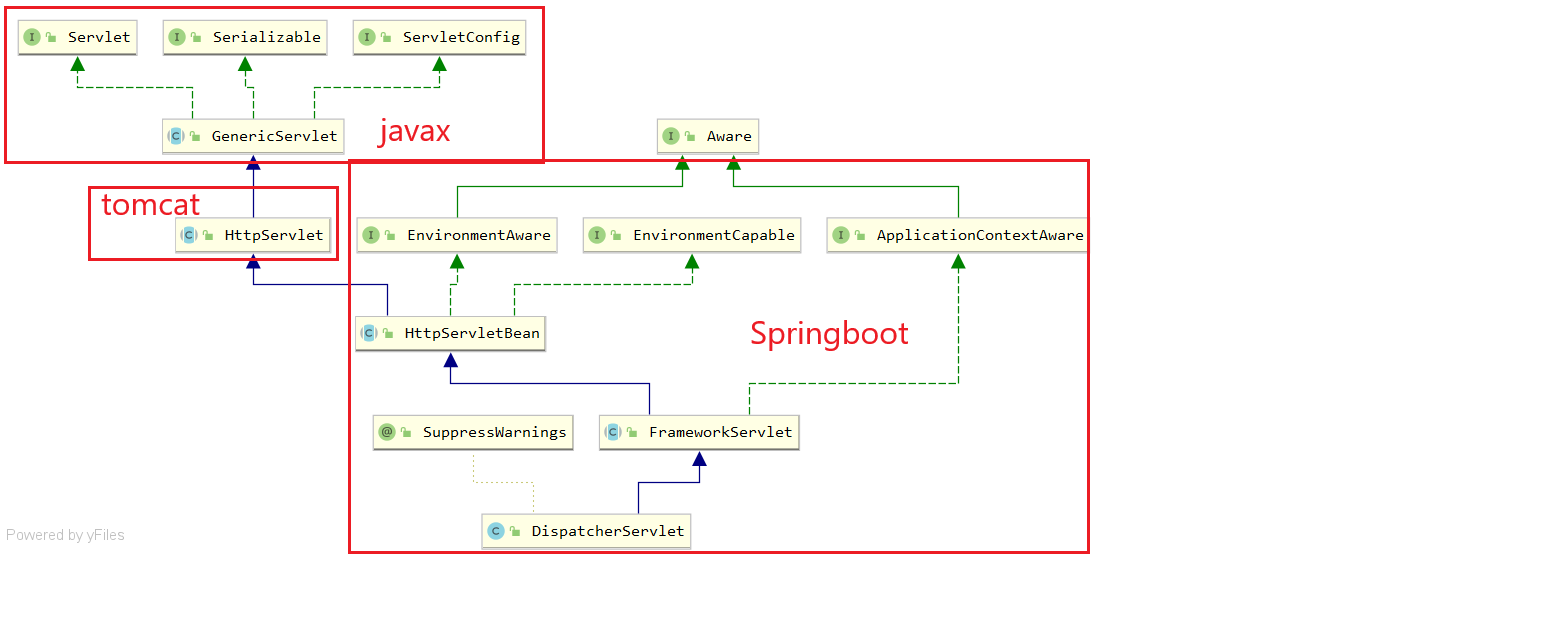
Servlet与HttpServlet
1 2 3 4 而HttpServlet即是大部分请求的处理对象,嵌入式引擎---->嵌入式容器---->webfilter---->weblistener javax.servlet.ServletContext#addServlet(java.lang.String, java.lang.Class<? extends javax.servlet.Servlet>)返回一个ServletRegistration对象,可用于进一步 配置已注册的servlet javax.servlet.ServletRegistration
1 2 3 4 5 6 7 8 9 10 11 12 13 14 15 16 17 18 19 20 21 22 23 24 25 public interface ServletRegistration extends Registration URL必须映射 public Set<String> addMapping (String... urlPatterns) public Collection<String> getMappings () public String getRunAsRole () public static interface Dynamic extends ServletRegistration , Registration .Dynamic { public void setLoadOnStartup (int loadOnStartup) public Set<String> setServletSecurity (ServletSecurityElement constraint) public void setMultipartConfig (MultipartConfigElement multipartConfig) public void setRunAsRole (String roleName) } }
思考:为什么Applacationcontext会有那么多重载方法?
1 2 3 4 5 6 7 8 9 10 11 12 13 14 15 16 17 18 @Override public ServletRegistration.Dynamic addServlet (String servletName, String className) { return addServlet(servletName, className, null , null ); } @Override public ServletRegistration.Dynamic addServlet (String servletName, Servlet servlet) { return addServlet(servletName, null , servlet, null ); } @Override public ServletRegistration.Dynamic addServlet (String servletName, Class<? extends Servlet> servletClass) return addServlet(servletName, servletClass.getName(), null , null ); }
–用在不同场景下解决同一类问题
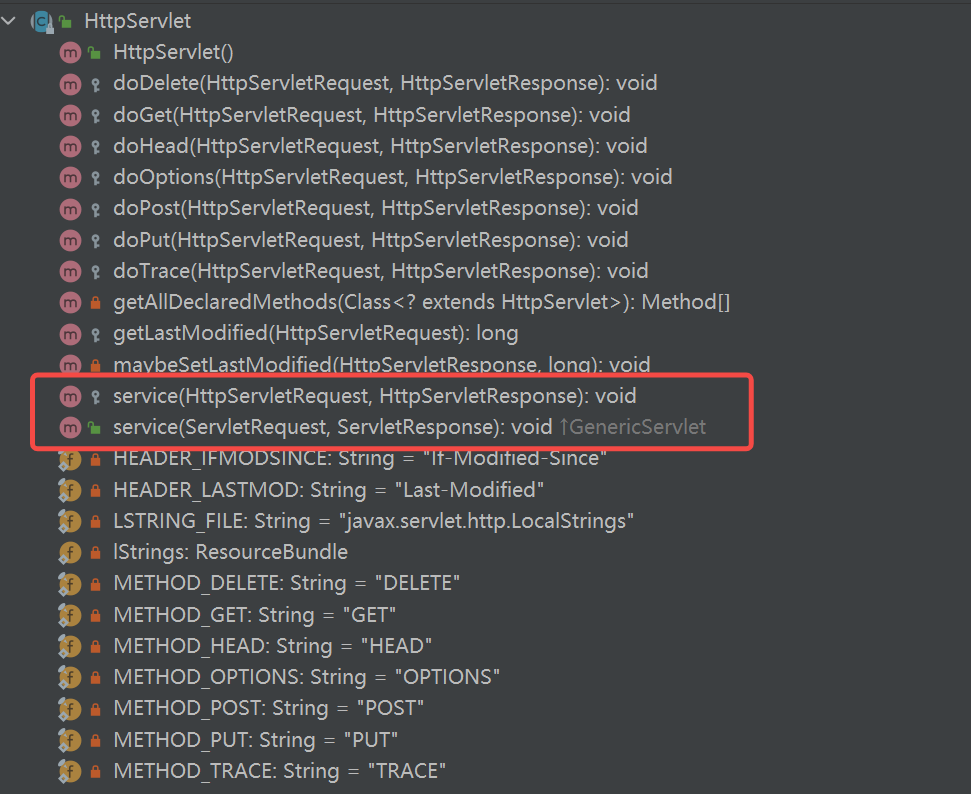
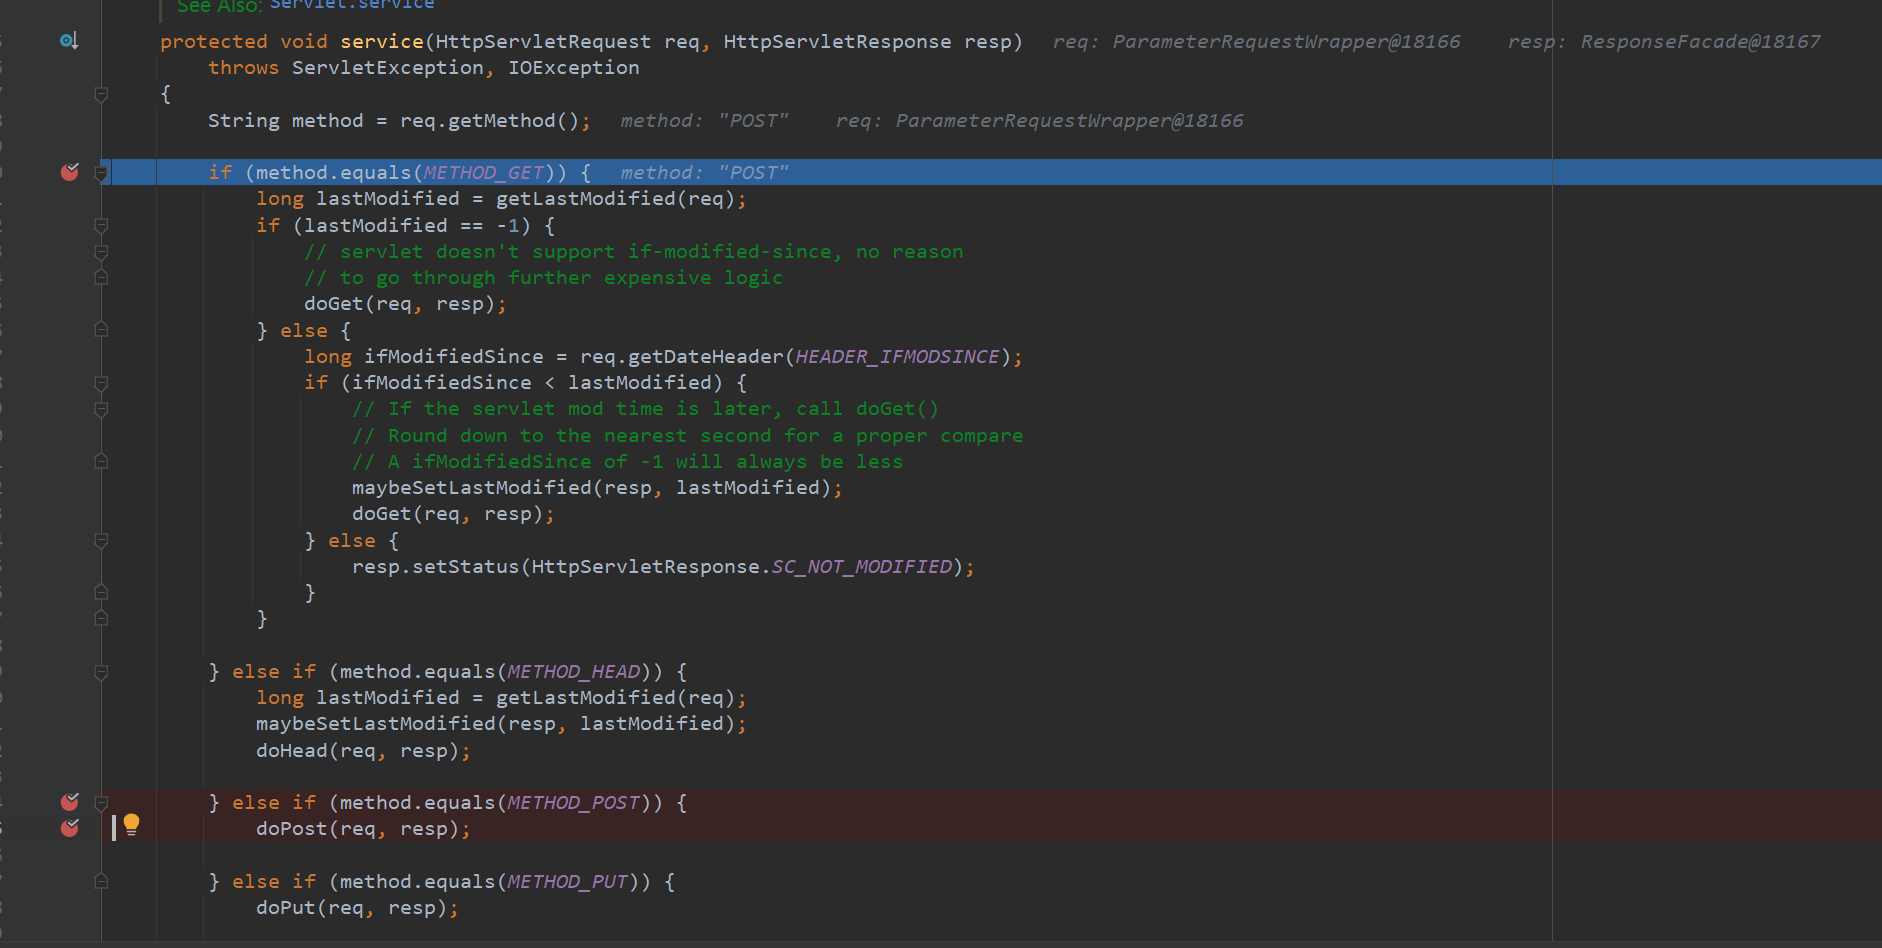
1 2 3 4 5 6 7 8 9 10 11 12 13 14 15 16 17 18 19 20 21 22 23 24 25 26 27 28 29 30 31 32 33 34 35 36 37 38 39 40 41 42 43 44 45 46 47 48 49 50 51 52 53 54 55 56 57 58 59 60 61 62 63 64 65 66 67 68 69 70 71 72 73 74 75 76 77 78 79 80 private static final String METHOD_DELETE = "DELETE" ; private static final String METHOD_HEAD = "HEAD" ; private static final String METHOD_GET = "GET" ; private static final String METHOD_OPTIONS = "OPTIONS" ; private static final String METHOD_POST = "POST" ; private static final String METHOD_PUT = "PUT" ; private static final String METHOD_TRACE = "TRACE" ; protected void service (HttpServletRequest req, HttpServletResponse resp) throws ServletException, IOException { String method = req.getMethod(); if (method.equals(METHOD_GET)) { long lastModified = getLastModified(req); if (lastModified == -1 ) { doGet(req, resp); } else { long ifModifiedSince = req.getDateHeader(HEADER_IFMODSINCE); if (ifModifiedSince < lastModified) { maybeSetLastModified(resp, lastModified); doGet(req, resp); } else { resp.setStatus(HttpServletResponse.SC_NOT_MODIFIED); } } } else if (method.equals(METHOD_HEAD)) { long lastModified = getLastModified(req); maybeSetLastModified(resp, lastModified); doHead(req, resp); } else if (method.equals(METHOD_POST)) { doPost(req, resp); } else if (method.equals(METHOD_PUT)) { doPut(req, resp); } else if (method.equals(METHOD_DELETE)) { doDelete(req, resp); } else if (method.equals(METHOD_OPTIONS)) { doOptions(req,resp); } else if (method.equals(METHOD_TRACE)) { doTrace(req,resp); } else { String errMsg = lStrings.getString("http.method_not_implemented" ); Object[] errArgs = new Object[1 ]; errArgs[0 ] = method; errMsg = MessageFormat.format(errMsg, errArgs); resp.sendError(HttpServletResponse.SC_NOT_IMPLEMENTED, errMsg); } } protected void doPost (HttpServletRequest req, HttpServletResponse resp) throws ServletException, IOException { String protocol = req.getProtocol(); String msg = lStrings.getString("http.method_post_not_supported" ); if (protocol.endsWith("1.1" )) { resp.sendError(HttpServletResponse.SC_METHOD_NOT_ALLOWED, msg); } else { resp.sendError(HttpServletResponse.SC_BAD_REQUEST, msg); } }
注:在javaHttpServlet中,与Tomcat中的dopost方法如出一辙
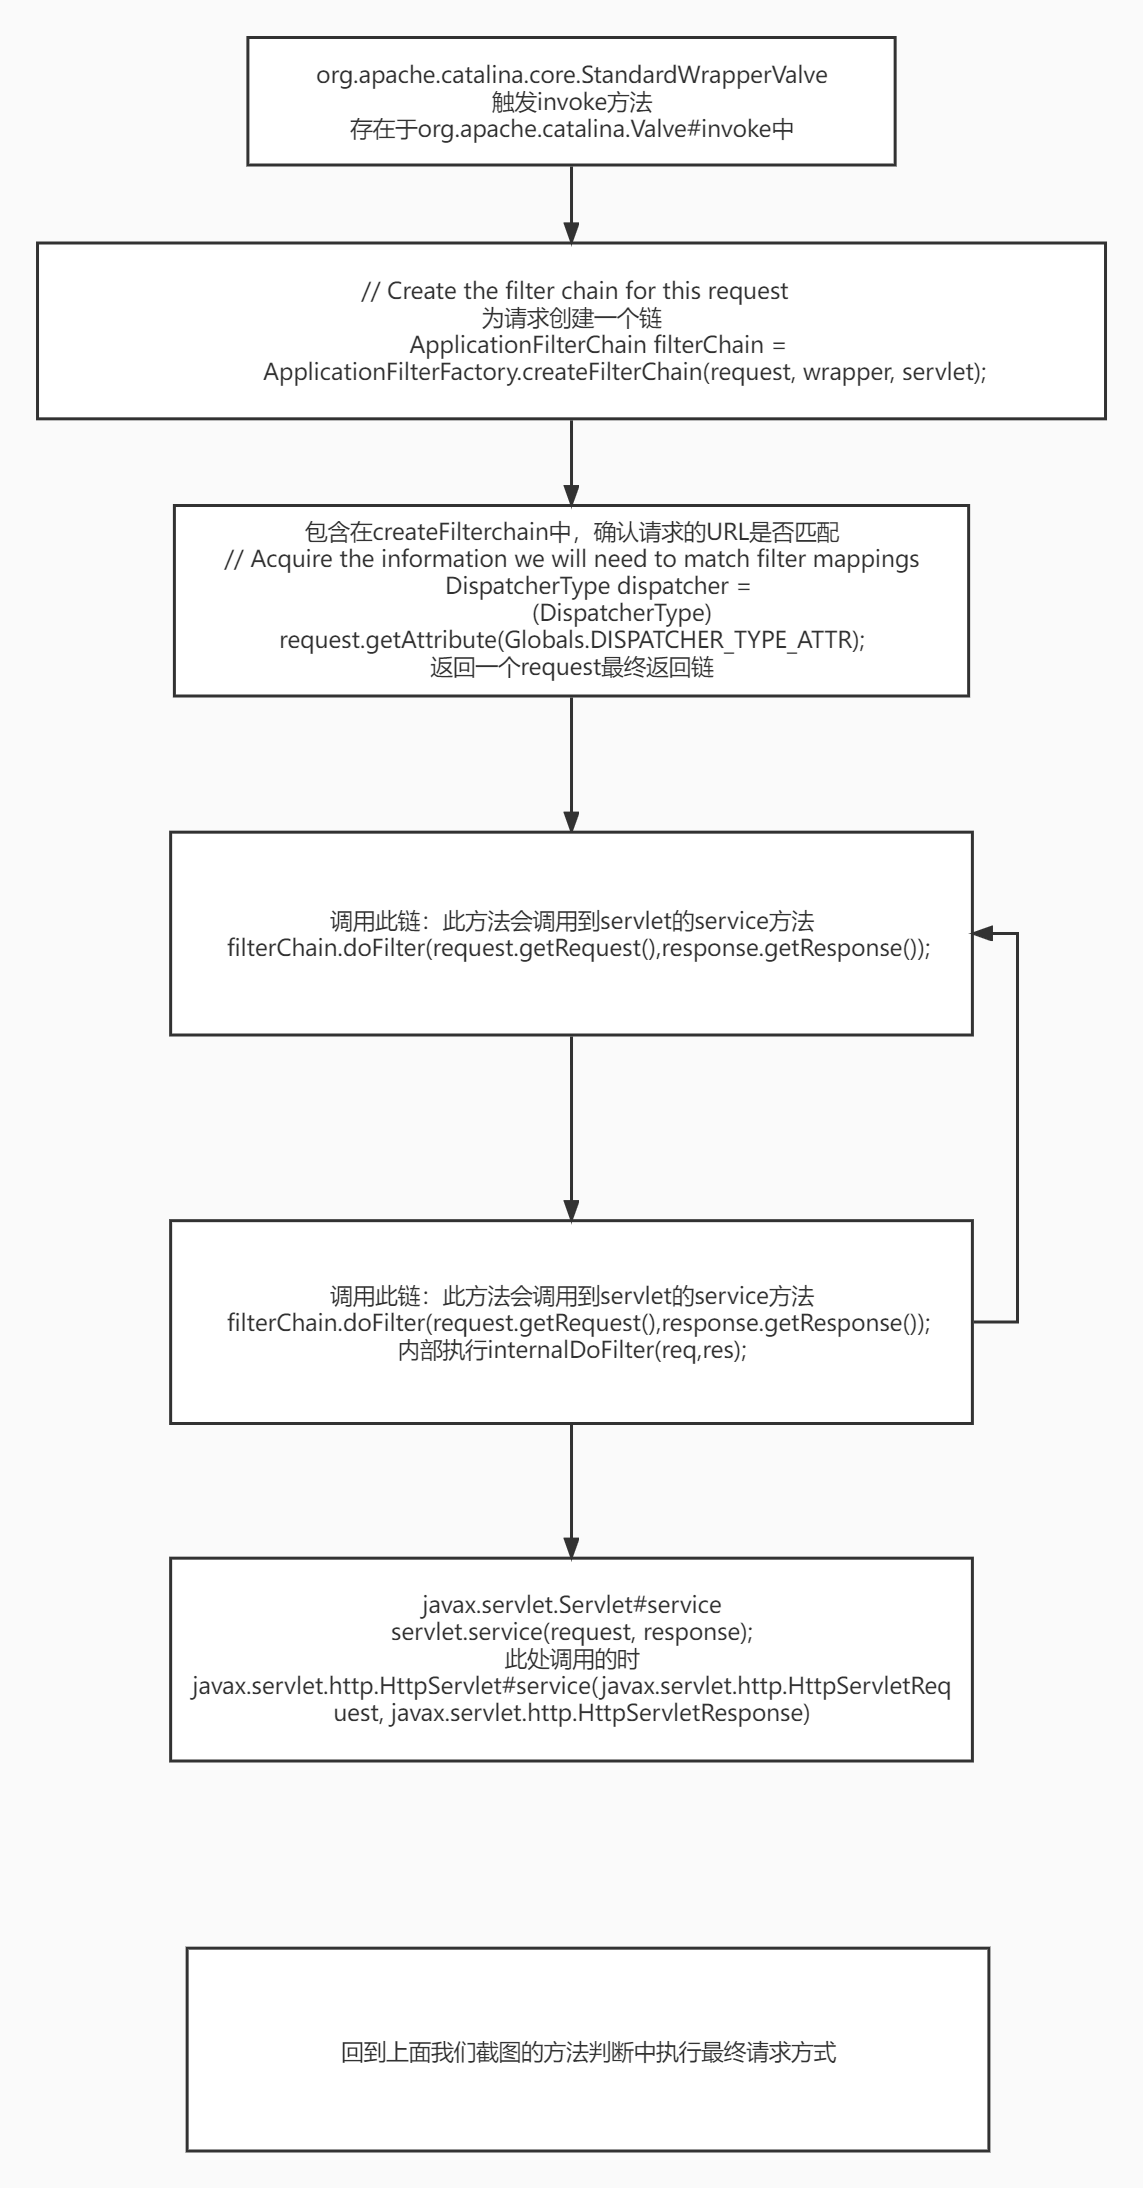
真正的调用链(妥妥的责任链模式)是
1 2 3 4 5 6 7 8 9 10 11 12 13 14 15 Tomcat与SpringMVC的结合点: (1)所有配置了路由信息的处理方法最终都是通过反射的方式进行调用的; (2)在Java8中,反射方法调用最终落脚于NativeMethodAccessorImpl类的native方法: private static native Object invoke0(Method var0, Object var1, Object[] var2); 在此处与JVM底层交互,实现跨代码衔接执行; (3)观察到的比较重要的设计模式:职责链模式(ApplicationFilterChain)、委派模式(DelegatingFilterProxy)、 工厂模式、策略模式、代理模式(FilterChainProxy)、外观模式、适配器模式(HandlerAdapter); (4)Tomcat与SpringMVC的结合点:ApplicationFilterChain与DispatcherServlet(继承于FrameworkServlet); (5)在集成了Tomcat的SpringBoot项目中,先启动的不是Tomcat,而是Spring,Spring的工厂(默认DefaultListableBeanFactory) 读取注解完成各类Bean(WebApplicationContext、securityFilterChainRegistration、dispatcherServletRegistration、各类FilterInitializer与Filter) 的初始化,放入IoC容器,然后做路由Mapping,创建FilterChain,开启JMX等; (6)Servlet、Filter是单实例多线程的,成员变量线程不安全,方法内局部变量线程安全;SingleThreadModel采用同步/实例池的方式来确保不会有两个线程同时执行servlet的service方法,但已被弃用,需自行确保成员变量线程安全; ———————————————— 版权声明:本文为CSDN博主「wanxu12345678910」的原创文章,遵循CC 4.0 BY-SA版权协议,转载请附上原文出处链接及本声明。 原文链接:https://blog.csdn.net/wanxu12345678910/article/details/83352371
ContextLoaderServlet与下文中的ContextLoaderListener功能完全相同
1 2 3 4 5 6 7 8 <servlet> <servlet-name>context</servlet-name> <servlet-class > org .springframework .web .context .ContextLoaderServlet </servlet -class > <load -on -startup >1</load -on -startup > </servlet >
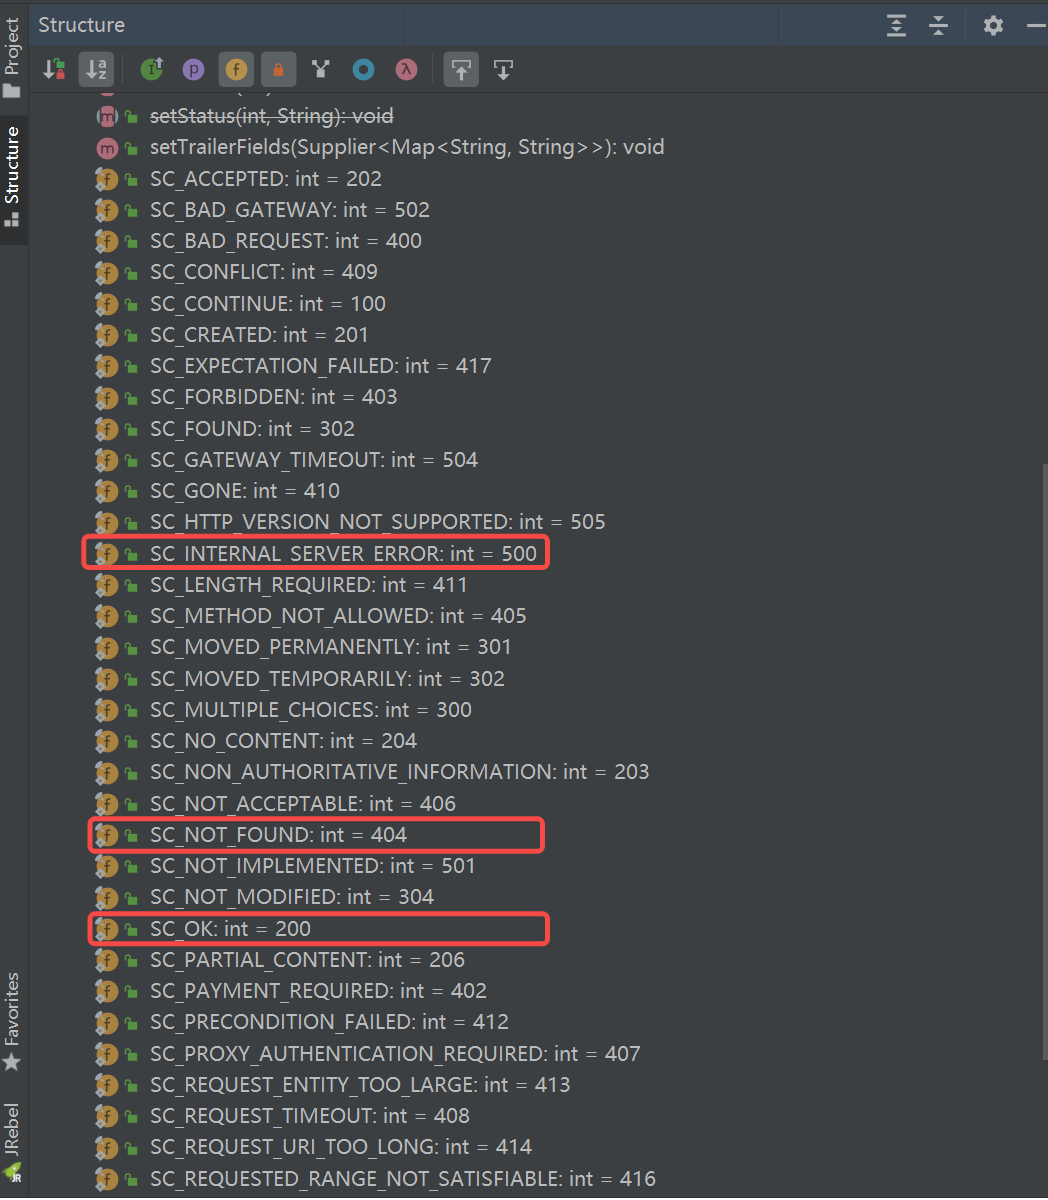
HttpServletResponse响应码
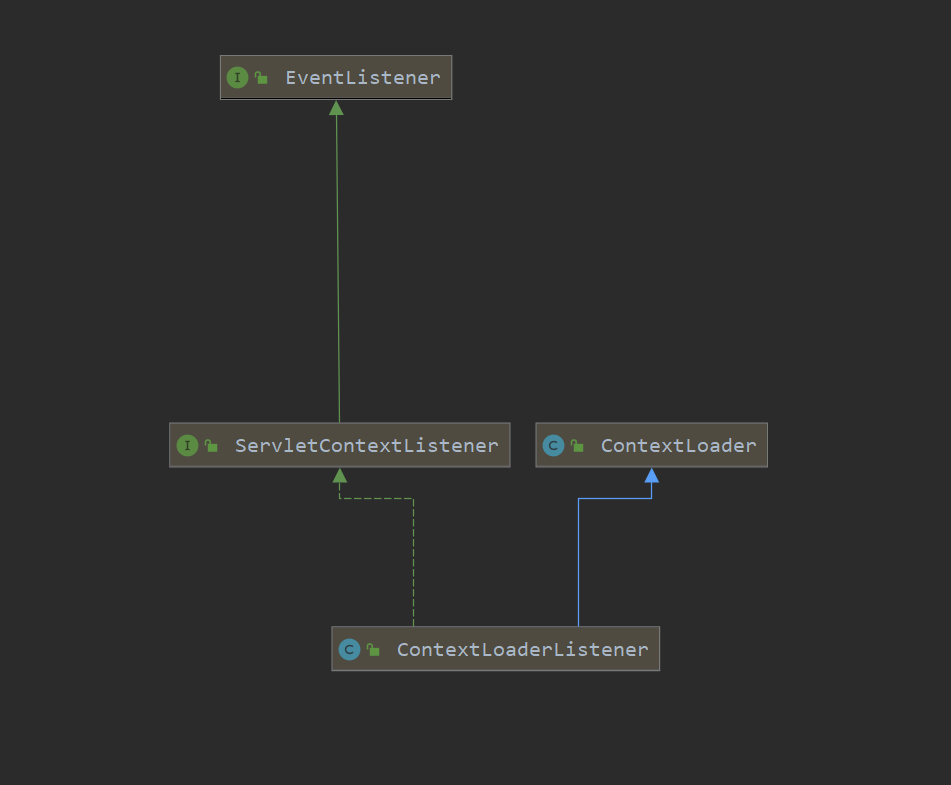
监听器: 实现接口、标记 比如MQ,观察者模式,所有的时间监听都会继承 extend java.util.EventListener接口,但里面什么都没有
1 2 3 4 5 6 7 public interface EventListener }
1 2 3 4 5 6 7 8 9 10 11 12 13 14 15 16 17 18 19 public class ContextLoaderListener extends ContextLoader implements ServletContextListener }
见名知意既然包含contextLoader必然跟上线文息息相关,在初始化容器时加载配置~
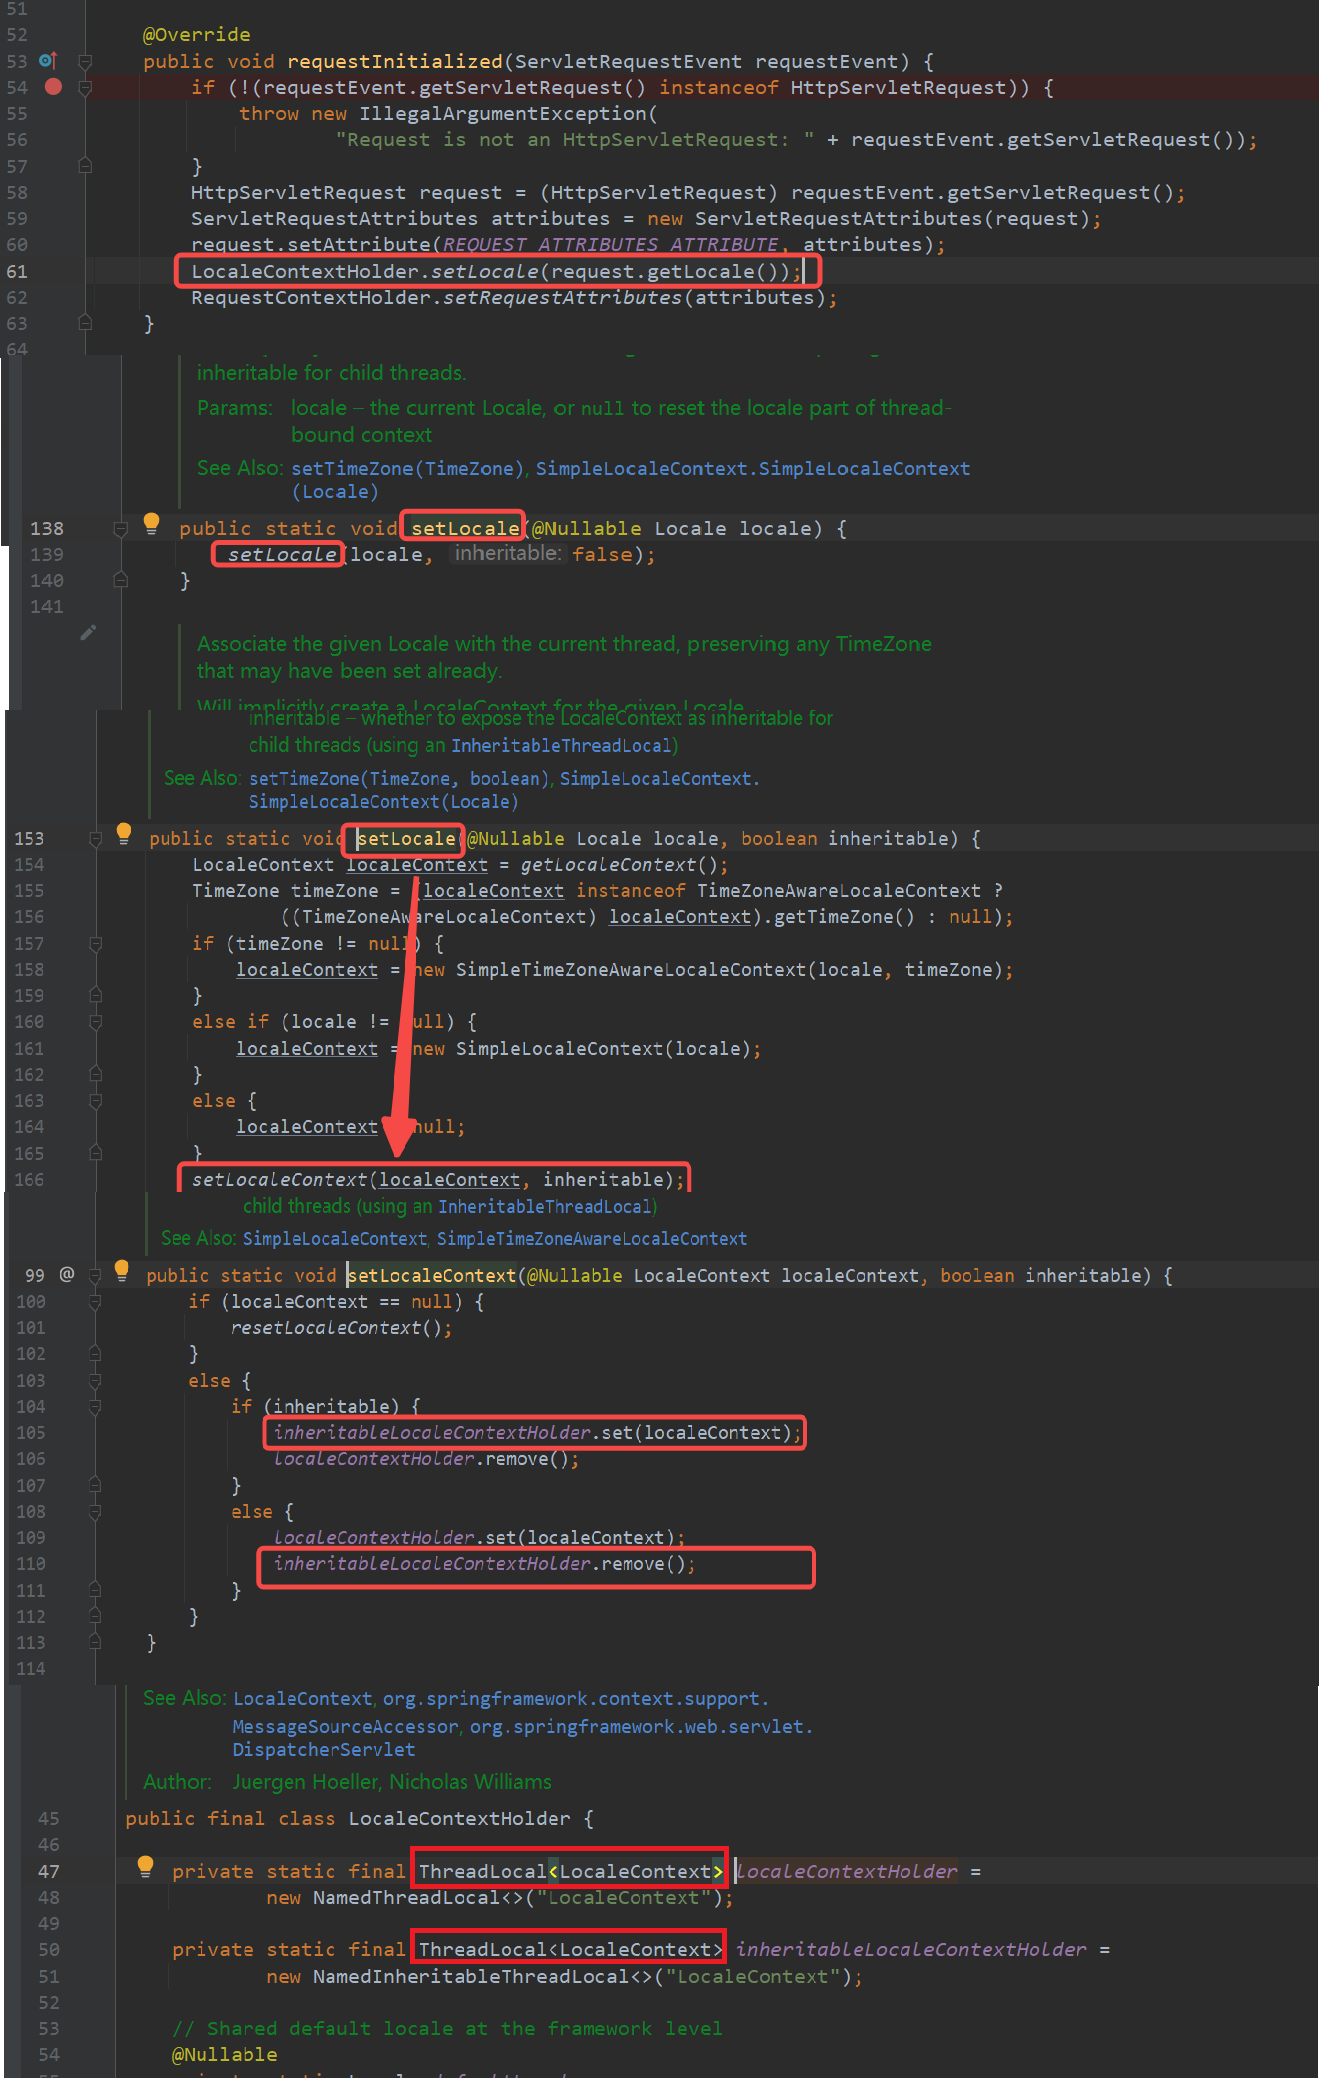
1 2 3 4 5 6 7 8 9 10 11 12 13 14 15 @Override public void requestInitialized (ServletRequestEvent requestEvent) if (!(requestEvent.getServletRequest() instanceof HttpServletRequest)) { throw new IllegalArgumentException( "Request is not an HttpServletRequest: " + requestEvent.getServletRequest()); } HttpServletRequest request = (HttpServletRequest) requestEvent.getServletRequest(); ServletRequestAttributes attributes = new ServletRequestAttributes(request); request.setAttribute(REQUEST_ATTRIBUTES_ATTRIBUTE, attributes); LocaleContextHolder.setLocale(request.getLocale()); RequestContextHolder.setRequestAttributes(attributes); }
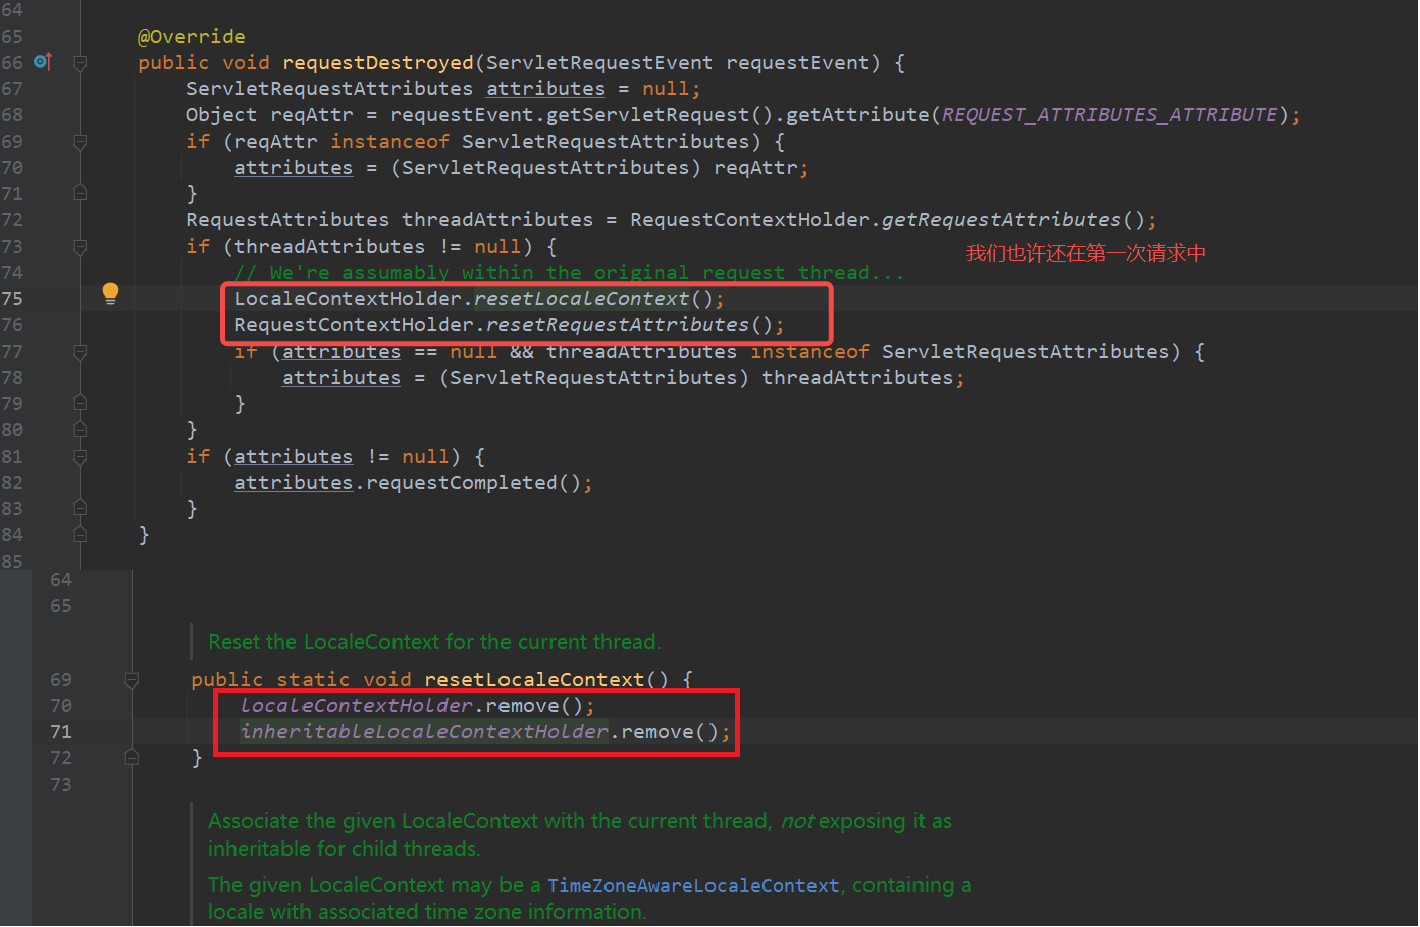
重要:Servlet在同一个线程中,当初始化时放到对象里,当请求销毁时,自动将Threadlocal对象销毁,防止了内存泄漏的问题
1 2 3 4 5 6 7 8 9 10 11 12 13 14 15 16 17 18 19 20 21 22 @Override public void requestDestroyed (ServletRequestEvent requestEvent) ServletRequestAttributes attributes = null ; Object reqAttr = requestEvent.getServletRequest().getAttribute(REQUEST_ATTRIBUTES_ATTRIBUTE); if (reqAttr instanceof ServletRequestAttributes) { attributes = (ServletRequestAttributes) reqAttr; } RequestAttributes threadAttributes = RequestContextHolder.getRequestAttributes(); if (threadAttributes != null ) { LocaleContextHolder.resetLocaleContext(); RequestContextHolder.resetRequestAttributes(); if (attributes == null && threadAttributes instanceof ServletRequestAttributes) { attributes = (ServletRequestAttributes) threadAttributes; } } if (attributes != null ) { attributes.requestCompleted(); } }
1 2 3 4 5 6 7 8 9 10 11 12 13 14 15 16 17 18 public class ContextLoaderListener extends ContextLoader implements ServletContextListener }
插播一句:在书写过程中发现某URL响应变慢,在分析SQL时,用到了in查询,执行分析计划用到了索引
Servlet on Springboot 组件扫描:ServletComponentScan 熟悉波~ 是不是应用跟Springboot的@ComponentScan如出一辙
1 2 3 4 5 6 7 8 9 10 11 12 13 14 15 16 17 18 19 20 21 22 23 24 25 26 27 28 29 30 31 32 33 34 35 36 @Target(ElementType.TYPE) @Retention(RetentionPolicy.RUNTIME) @Documented @Import(ServletComponentScanRegistrar.class) public @interface ServletComponentScan { @AliasFor("basePackages") String[] value() default {}; @AliasFor("value") String[] basePackages() default {}; Class<?>[] basePackageClasses() default {}; }
配置声明:@interface 暴露SpringBean @Bean
filter: webFilter
激活Springbootweb
文无第一,武无第二,没有最好的技术框架或体系,只有最适合当下业务的框架或体系
组装SpringApplicationBuilder 你看看这名字就知道他以后干啥的,并且它包含了太多太多的东西,
1 2 3 4 5 6 7 8 9 10 11 12 13 14 15 16 17 18 19 20 private final SpringApplication application;private ConfigurableApplicationContext context;private SpringApplicationBuilder parent;AtomicBoolean是不是的看看 private final AtomicBoolean running = new AtomicBoolean(false );private final Set<Class<?>> sources = new LinkedHashSet<>();private final Map<String, Object> defaultProperties = new LinkedHashMap<>();private ConfigurableEnvironment environment;private Set<String> additionalProfiles = new LinkedHashSet<>();private boolean registerShutdownHookApplied;private boolean configuredAsChild = false ;
1 2 3 4 5 6 7 8 9 10 11 12 13 14 15 16 17 18 19 20 21 @SpringBootApplication public class TestProfiles public static void main (String[] args) ConfigurableApplicationContext context = new SpringApplicationBuilder(TestProfiles.class) .properties("spring.config.location=classpath:/test-profiles.yml" ) .properties("spring.profiles.active=oracle" ) .run(args); System.out.println(context.getEnvironment().getProperty("jdbc.driver" )); ConfigurableApplicationContext context2 = new SpringApplicationBuilder(TestProfiles.class) .properties("spring.config.location=classpath:/test-profiles.yml" ) .properties("spring.profiles.active=mysql" ) .properties("server.port=8848" ) .run(args); System.out.println(context2.getEnvironment().getProperty("jdbc.driver" )); } }
Springboot自动装配
ClassLoader
1 2 3 4 5 6 7 8 9 10 11 12 13 14 15 16 public static void main (String[] args) ClassLoader contextClassLoader = Thread.currentThread().getContextClassLoader(); while (true ) { System.out.println(contextClassLoader.getClass().getName()); ClassLoader parent = contextClassLoader.getParent(); if (parent == null ) { break ; } } ClassLoader systemClassLoader = ClassLoader.getSystemClassLoader(); System.out.println(systemClassLoader.getClass().getName()); }
update_time =2022年2月14日13:48:19
传统的Servlet容器 Apache Tomcat 这里只记录了部分重要场景
HttpServletResponse javax.servlet.http.HttpServletResponse
1 2 3 4 5 6 7 8 9 10 11 12 13 14 15 public static void main (String[] args) ClassLoader contextClassLoader = Thread.currentThread().getContextClassLoader(); while (true ) { System.out.println(contextClassLoader.getClass().getName()); ClassLoader parent = contextClassLoader.getParent(); if (parent == null ) { break ; } } ClassLoader systemClassLoader = ClassLoader.getSystemClassLoader(); System.out.println(systemClassLoader.getClass().getName()); }
除了其中的状态码之外,结合最近的测试其中的实现可具体参考
静态资源处理类org.apache.catalina.servlets.DefaultServlet 注意下包名
大多数情况下我们关注的更多是server.xml中Tomcat的配置,而在web.xml中除了路径映射等配置外
1 2 3 4 5 6 7 8 9 10 11 12 <!-- The mapping for the default servlet --> <servlet-mapping> <servlet-name>default </servlet-name> <url-pattern>/</url-pattern> </servlet-mapping> <!-- The mappings for the JSP servlet --> <servlet-mapping> <servlet-name>jsp</servlet-name> <url-pattern>*.jsp</url-pattern> <url-pattern>*.jspx</url-pattern> </servlet-mapping>
关于是否是开发模式
1 2 3 4 <!-- development Is Jasper used in development mode? If true , --> <!-- the frequency at which JSPs are checked for --> <!-- modification may be specified via the --> <!-- modificationTestInterval parameter. [true ] -->
由于DefaultServlet是HttpServlet的子类,所以在此不展开讨论
1 <Connector port="8080" protocol="HTTP/1.1" connectionTimeout="20000" redirectPort="8443" />
而在JDBC中的大多数类中也遵循此规则,那么就上面这段分析标签Connector则对应
1 2 3 4 5 6 public Connector () this ("org.apache.coyote.http11.Http11NioProtocol" ); }
而在tomcat8.0+中getProtocol对应protocol
1 2 3 4 protected int redirectPort = 443 ;
关于标签中connector中这个Http11NioProtocol则在tomcat官方文档中可见其中一句话
1 When using HTTP connectors (based on APR or NIO/NIO2), Tomcat supports using sendfile to send large static files. These writes, as soon as the system load increases, will be performed asynchronously in the most efficient way. Instead of sending a large response using blocking writes, it is possible to write content to a static file, and write it using a sendfile code. A caching valve could take advantage of this to cache the response data in a file rather than store it in memory. Sendfile support is available if the request attribute org.apache.tomcat.sendfile.support is set to Boolean.TRUE
也可在server.xml中搜索
1 2 3 4 5 6 7 <!-- Define an AJP 1.3 Connector on port 8009 --> <!-- <Connector protocol="AJP/1.3" address="::1" port="8009" redirectPort="8443" /> -->
server.port在文件中的位置
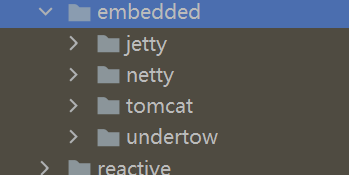
重点来了 ServerProperties包含了tomcat,Jetty,Undertow,而在Springboot2.2.6中则存在Netty 那么理所当然,在tomcat中的一些配置也存在于此
1 2 3 4 5 6 7 8 9 private int maxThreads = 200 ;private int minSpareThreads = 10 ;
那么为什么Tomcat被称之为嵌入式容器呢? 在启动时无需自启动容器,在Bootstrap中调用tomcat,另外tomcat中TomcatEmbeddedContext,Embedded即直译为嵌入式
1 2 3 4 5 6 7 8 9 10 11 12 private Stream<Wrapper> getLoadOnStartupWrappers (Container[] children) Map<Integer, List<Wrapper>> grouped = new TreeMap<>(); for (Container child : children) { Wrapper wrapper = (Wrapper) child; int order = wrapper.getLoadOnStartup(); if (order >= 0 ) { grouped.computeIfAbsent(order, ArrayList::new ); grouped.get(order).add(wrapper); } } return grouped.values().stream().flatMap(List::stream); }
因为要看下Netty,所以还是重新看下server.properties
1 2 3 4 5 { "name": "server", "type": "org.springframework.boot.autoconfigure.web.ServerProperties", "sourceType": "org.springframework.boot.autoconfigure.web.ServerProperties" }
那既然为了看Netty在这个json文件中同样存在
1 2 3 4 5 6 { "name": "server.netty", "type": "org.springframework.boot.autoconfigure.web.ServerProperties$Netty", "sourceType": "org.springframework.boot.autoconfigure.web.ServerProperties", "sourceMethod": "getNetty()" }
既然在json中存在getNetty等方法,猜测那么对应的ServerProperties也存在对应的方法,
当一次请求发起都发生了什么? 用户通过浏览器进行了一个操作,这个操作可以是输入url地址并回车,或者是点击超链接,或者是在搜索框中输入关键字进行搜索,接着浏览器就捕获到了这个事件
Tomcat 作为一个 HTTP 服务器,主要需要完成的功能是接受连接、解析请求数据、处理请求和发送响应这几个步骤。https://www.jianshu.com/p/7c9401b85704
导入过程Running With JRE 7 Or Later
启动tomcat所需环境
1 2 3 4 5 6 7 8 else eval $_NOHUP "\"$_RUNJAVA\"" "\"$CATALINA_LOGGING_CONFIG\"" $LOGGING_MANAGER "$JAVA_OPTS" "$CATALINA_OPTS" \ -D$ENDORSED_PROP="\"$JAVA_ENDORSED_DIRS\"" \ -classpath "\"$CLASSPATH\"" \ -Dcatalina.base="\"$CATALINA_BASE\"" \ -Dcatalina.home="\"$CATALINA_HOME\"" \ -Djava.io.tmpdir="\"$CATALINA_TMPDIR\"" \ org.apache.catalina.startup.Bootstrap "$@" start \
后续不在赘述。重点在Server.properties中版本区别是否包含Netty的这个类,
一方库、二方库、三方库说明 有些二方库为apache所需类库,当然定义也尽相同,以统一标准为准吧~就像嵌入式这个单词,
一方库:本工程中的各模块的相互依赖
1 2 3 4 5 6 7 8 9 10 11 12 13 14 private Stream<Wrapper> getLoadOnStartupWrappers (Container[] children) Map<Integer, List<Wrapper>> grouped = new TreeMap<>(); for (Container child : children) { Wrapper wrapper = (Wrapper) child; int order = wrapper.getLoadOnStartup(); if (order >= 0 ) { grouped.computeIfAbsent(order, ArrayList::new ); grouped.get(order).add(wrapper); } } return grouped.values().stream().flatMap(List::stream); }
再比如这里面的grouped.computeIfAbsent(order, ArrayList::new);其中Absent译为缺席,入参是key=order,以及函数方法,在key!=null的情况下赋值为newAraayList并返回去。https://www.cnblogs.com/yucy/p/10260014.html
JDBC中的servlet
数据库三大范式:
1 2 3 4 5 6 7 8 9 10 11 12 13 14 15 16 17 18 19 20 21 22 23 24 25 26 27 28 29 30 31 32 33 34 35 36 37 38 39 40 41 42 43 44 public class PayController private Logger logger = LoggerFactory.getLogger(PayController.class); public boolean doPay (String uId, String tradeId, BigDecimal amount, int channelType, int modeType) if (1 == channelType) { logger.info("模拟微信渠道⽀付划账开始。uId:{} tradeId:{} amount: { } " , uId, tradeId, amount); if (1 == modeType) { logger.info("密码⽀付,⻛控校验环境安全" ); } else if (2 == modeType) { logger.info("⼈脸⽀付,⻛控校验脸部识别" ); } else if (3 == modeType) { logger.info("指纹⽀付,⻛控校验指纹信息" ); 上⾯的类提供了⼀个⽀付服务功能,通过提供的必要字段; ⽤户ID 、交易ID 、 ⾦额 、渠道 、模 式 ,来控制⽀付⽅式。 以上的 ifelse 应该是最差的⼀种写法,即使写 ifelse 也是可以优化的⽅式去写的。 3. 测试验证 3.1 编写测试类 以上分别测试了两种不同的⽀付类型和⽀付模式;微信⼈脸⽀付、⽀付宝指纹⽀付 3.2 测试结果 } } else if (2 == channelType) { logger.info("模拟⽀付宝渠道⽀付划账开始。uId:{} tradeId:{} amount: { } " , uId, tradeId, amount); if (1 == modeType) { logger.info("密码⽀付,⻛控校验环境安全" ); } else if (2 == modeType) { logger.info("⼈脸⽀付,⻛控校验脸部识别" ); } else if (3 == modeType) { logger.info("指纹⽀付,⻛控校验指纹信息" ); } } return true ; } }
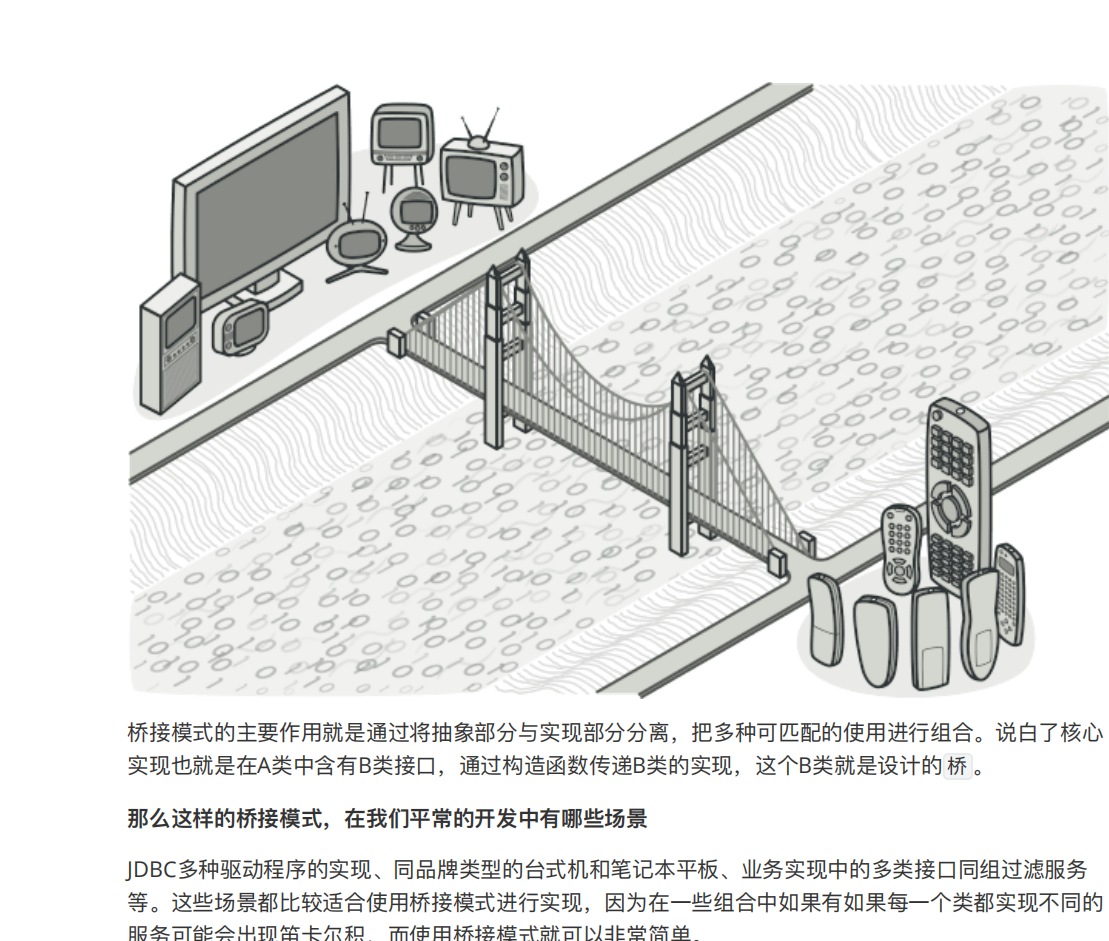
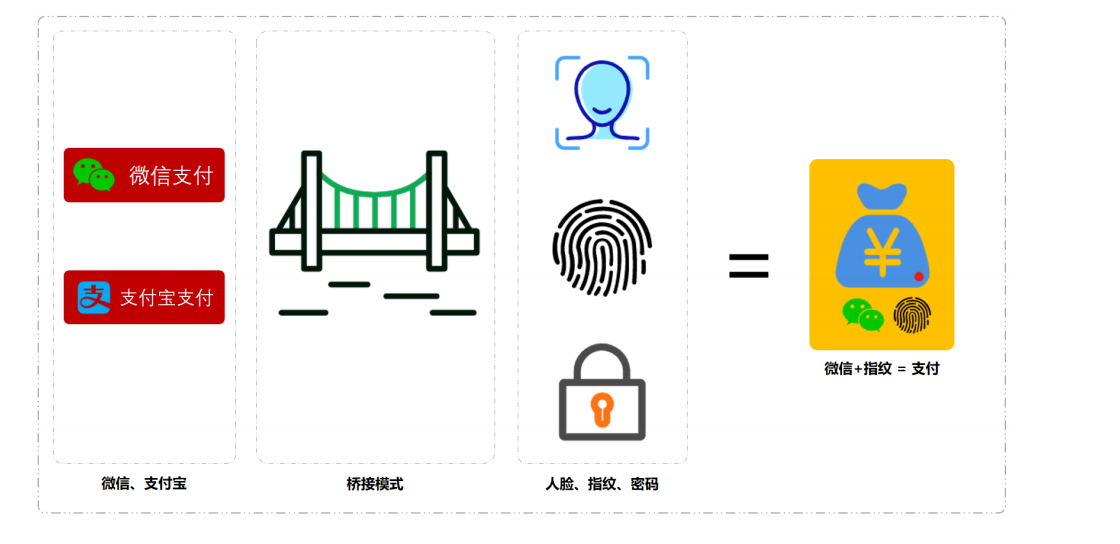
其实面对这种情况一般我是看到大多数是应用策略+模板的,桥接真的很少听
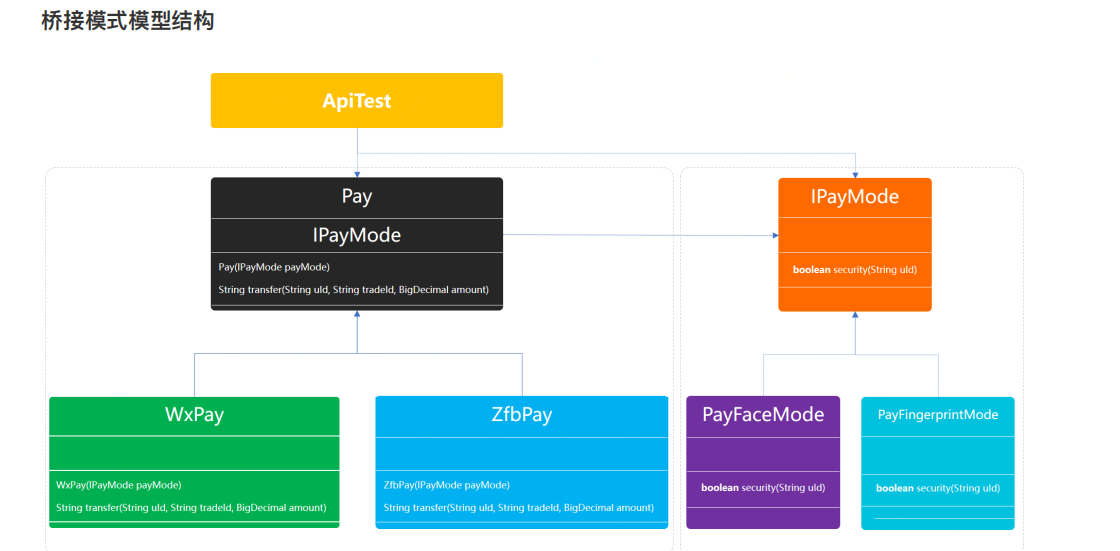
1 2 3 4 5 6 7 8 9 public abstract class Pay protected Logger logger = LoggerFactory.getLogger(Pay.class); protected IPayMode payMode; public Pay (IPayMode payMode) this .payMode = payMode; } public abstract String transfer (String uId, String tradeId, BigDecimal amount) }
在这个类中定义了⽀付⽅式的需要实现的划账接⼝: transfer ,以及桥接接⼝; IPayMode ,并
1 2 3 4 5 6 7 8 9 10 11 12 13 14 15 16 17 18 19 20 public class WxPay extends Pay public WxPay (IPayMode payMode) super (payMode); } public String transfer (String uId, String tradeId, BigDecimal amount) logger.info("模拟微信渠道⽀付划账开始。uId:{} tradeId:{} amount:{}" , uId, tradeId, amount); boolean security = payMode.security(uId); logger.info("模拟微信渠道⽀付⻛控校验。uId:{} tradeId:{} security: {}" , uId, tradeId, security); if (!security) { logger.info("模拟微信渠道⽀付划账拦截。uId:{} tradeId:{} amount: {}" , uId, tradeId, amount); return "0001" ; } logger.info("模拟微信渠道⽀付划账成功。uId:{} tradeId:{} amount:{}" , uId, tradeId, amount); return "0000" ; } }
支付宝支付
1 2 3 4 5 6 7 8 9 10 11 12 13 14 15 16 17 18 19 20 public class ZfbPay extends Pay { public ZfbPay(IPayMode payMode) { super(payMode); } public String transfer(String uId, String tradeId, BigDecimal amount) { logger.info("模拟⽀付宝渠道⽀付划账开始。uId:{} tradeId:{} amount: {}" , uId, tradeId, amount); boolean security = payMode.security(uId); logger.info("模拟⽀付宝渠道⽀付⻛控校验。uId:{} tradeId:{} security: {}" , uId, tradeId, security); if (!security) { logger.info("模拟⽀付宝渠道⽀付划账拦截。uId:{} tradeId:{} amount:{}" , uId, tradeId, amount); return "0001" ; } logger.info("模拟⽀付宝渠道⽀付划账成功。uId:{} tradeId:{} amount: {}" , uId, tradeId, amount); return "0000" ; } }
1 2 3 4 public interface IPayMode { boolean security(String uId); }
刷脸
1 2 3 4 5 6 7 8 public class PayFaceMode implements IPayMode protected Logger logger = LoggerFactory.getLogger(PayCypher.class); public boolean security (String uId) logger.info("⼈脸⽀付,⻛控校验脸部识别" ); return true ; } } 其他同上
测试类编写
1 2 3 4 5 6 7 8 9 10 @Test public void test_pay () System.out.println("\r\n模拟测试场景;微信⽀付、⼈脸⽅式。" ); Pay wxPay = new WxPay(new PayFaceMode()); wxPay.transfer("weixin_1092033111" , "100000109893" , new BigDecimal(100 )); System.out.println("\r\n模拟测试场景;⽀付宝⽀付、指纹⽅式。" ); Pay zfbPay = new ZfbPay(new PayFingerprintMode()); zfbPay.transfer("jlu19dlxo111" ,"100000109894" ,new BigDecimal(100 )); }
ResultSet executeQuery(String sql) throws SQLException; 1 2 3 4 5 6 7 8 9 10 11 12 13 <dependency> <groupId>commons-dbcp</groupId> <artifactId>commons-dbcp</artifactId> </dependency> org.springframework.transaction.interceptor.TransactionInterceptor @Nullable public Object invoke (MethodInvocation invocation) throws Throwable Class<?> targetClass = invocation.getThis() != null ? AopUtils.getTargetClass(invocation.getThis()) : null ; Method var10001 = invocation.getMethod(); invocation.getClass(); return this .invokeWithinTransaction(var10001, targetClass, invocation::proceed); } org.springframework.transaction.TransactionDefinition
其实这里看不出来跟servlet的关联性有多么高,如果实在要说其中的关联性,
1 2 3 4 5 6 @CallerSensitive public static Connection getConnection (String url, java.util.Properties info) throws SQLException return (getConnection(url, info, Reflection.getCallerClass())); }
CallerSensitive是什么鬼? CallerSensitive老规矩,猜测下Caller=调用,Sensitive=敏感的,那么标识在方法上则是当调用方法时的一些控制。
学习方法就是学习大佬的学习方法 这里JDBC就先到此为止,我先不得不先记录下我在javacache中遇到的小问题思考。
为什么有ConcurrentHashMap还要加入synchronized 在org.springframework.cache.support.AbstractCacheManager中有一段关于初始化缓存静态配置的代码。
1 2 3 4 5 6 7 8 9 10 11 12 13 14 15 16 17 18 19 20 21 22 public void initializeCaches () Collection<? extends Cache> caches = loadCaches(); synchronized (this .cacheMap) { this .cacheNames = Collections.emptySet(); this .cacheMap.clear(); Set<String> cacheNames = new LinkedHashSet<>(caches.size()); for (Cache cache : caches) { String name = cache.getName(); this .cacheMap.put(name, decorateCache(cache)); cacheNames.add(name); } this .cacheNames = Collections.unmodifiableSet(cacheNames); } }
Triggered:触发
谁提出谁解决:concurrentHashMap只能保证一次操作的原子性,一系列操作的时候就需要加锁了,不能保证第N+1个线程进来的时候获取到的状态是未clear的
Collections.emptySet():如果你想 new 一个空的 List ,而这个 List 以后也不会再添加元素,那么就用 Collections.emptyList() 好了。
还有一个
1 2 3 4 5 6 7 8 9 10 11 12 13 14 15 16 17 18 19 20 21 22 23 24 25 26 27 28 29 30 31 32 33 34 35 36 37 38 39 40 41 42 43 44 45 46 47 48 49 @Override @Nullable public Cache getCache (String name) Cache cache = this .cacheMap.get(name); if (cache != null ) { return cache; } else { synchronized (this .cacheMap) { cache = this .cacheMap.get(name); if (cache == null ) { cache = getMissingCache(name); if (cache != null ) { cache = decorateCache(cache); this .cacheMap.put(name, cache); updateCacheNames(name); } } return cache; } } } 其中的getMissingCache方法 @Nullable protected Cache getMissingCache (String name) return null ; } 无论如何都要返回null ,那么他还要进行判空意义又何在? 源码注释是这样写的 Return a missing cache with the specified name, or null if such a cache does not exist or could not be created on demand. Caches may be lazily created at runtime if the native provider supports it. If a lookup by name does not yield any result, an AbstractCacheManager subclass gets a chance to register such a cache at runtime. The returned cache will be automatically added to this cache manager. 返回指定名称的缺失缓存,如果此类缓存不存在或无法按需创建,则返回null 。 如果本机提供程序支持,可以在运行时延迟创建缓存,就是其扩展实际是在子类中来复写的, 注意:在spring-data-redis的1.7 .2 中是没有复写此方法的 在官网中查询https: 接入了 <dependency> <groupId>org.springframework.data</groupId> <artifactId>spring-data-redis</artifactId> <version>2.1 .9 .RELEASE</version> </dependency> 低版本可是没有的呢,具体变化是在2. X前后的区别 protected RedisCache getMissingCache (String name) return allowInFlightCacheCreation ? createRedisCache(name, defaultCacheConfig) : null ; }
第二次见到identityHashMap 实际应用https://mp.weixin.qq.com/s?__biz=Mzg2ODA3NjA1MA==&mid=2247484317&idx=1&sn=1a5d78d0e5d5e09b1d2ca969a5ae7d23&chksm=ceb09ce0f9c715f6688bf4b38a933730f61df7b432b3ac452924b502fba735e048289c3e0d91&token=950928768&lang=zh_CN#rd
1 2 3 4 5 6 7 8 9 10 11 12 13 14 15 16 17 18 19 public static void main(String[] args) { var var1 = new Integer(1); var var2 = new Integer(1); System.out.println(var1.equals(var2)); System.out.println(var1.hashCode()); System.out.println(var2.hashCode()); System.out.println(System.identityHashCode(var1)); System.out.println(System.identityHashCode(var2)); } 控制台输出 true 1 1 1524960486 117009527
org.springframework.cache.Cache对于缓存是应用接口,https://www.jianshu.com/p/f6a1eae
接着来看缓存类CacheManager 从名字就能看出是管理缓存的类,CacheManager有两种,一种是Spring的,一种是javax的,就是上面所说的扩展类,但实现确实大体一致,
CachingProvider:创建、配置、获取、管理和控制多个CacheManagerhttps://cloud.tencent.com/developer/article/1497762
1 2 3 4 5 6 7 8 9 10 11 @Override protected Collection<RedisCache> loadCaches () List<RedisCache> caches = new LinkedList<>(); for (Map.Entry<String, RedisCacheConfiguration> entry : initialCacheConfiguration.entrySet()) { caches.add(createRedisCache(entry.getKey(), entry.getValue())); } return caches; }
读取缓存的配置时间,一级缓存60s,二级缓存30s
1 2 3 4 org.springframework.boot.autoconfigure.cache.CacheAutoConfiguration.AutoConfigureAfter= org.springframework.boot.autoconfigure.couchbase.CouchbaseAutoConfiguration, org.springframework.boot.autoconfigure.hazelcast.HazelcastAutoConfiguration, org.springframework.boot.autoconfigure.data.redis.RedisAutoConfiguration
启动时
1 2 3 4 5 6 7 8 9 10 c.y.c.b.redis.config.RedisConfiguration : [BSF][Redis]已启动,addressList: 2022 -02 -18 15 :04 :45.674 INFO 2604 --- [ main] c.y.c.b.e.c.EurekaClientConfiguration : [BSF][Eureka-Client]已启动!!! eureka.client.serviceUrl.defaultZone=http:2022 -02 -18 15 :04 :47.846 WARN 2604 --- [ main] c.n.c.sources.URLConfigurationSource : No URLs will be polled as dynamic configuration sources.2022 -02 -18 15 :04 :47.847 INFO 2604 --- [ main] c.n.c.sources.URLConfigurationSource : To enable URLs as dynamic configuration sources, define System property archaius.configurationSource.additionalUrls or make config.properties available on classpath.2022 -02 -18 15 :04 :47.943 INFO 2604 --- [ main] c.netflix.config.DynamicPropertyFactory : DynamicPropertyFactory is initialized with configuration sources: com.netflix.config.ConcurrentCompositeConfiguration@4bf9f44b2022 -02 -18 15 :04 :54.662 INFO 2604 --- [ main] c.y.c.b.s.ShardingJdbcConfiguration : [BSF][Sharding-jdbc]已启动!!!2022 -02 -18 15 :04 :57.232 INFO 2604 --- [ main] com.alibaba.druid.pool.DruidDataSource : {dataSource-1 } inited2022 -02 -18 15 :04 :58.661 INFO 2604 --- [ main] com.alibaba.druid.pool.DruidDataSource : {dataSource-2 } inited2022 -02 -18 15 :05 :02.531 ERROR 2604 --- [ main] c.b.mybatisplus.MybatisConfiguration
或者在redisconfig中配置
1 2 3 4 5 6 7 8 9 10 11 12 13 14 15 16 17 18 19 20 21 22 23 24 25 26 27 28 29 30 31 32 33 34 35 36 37 38 39 40 41 42 43 44 45 46 47 48 49 50 51 52 53 54 55 56 57 58 59 @Configuration public class RedisCacheConfig @Bean public KeyGenerator simpleKeyGenerator () return (o, method, objects) -> { StringBuilder stringBuilder = new StringBuilder(); stringBuilder.append(o.getClass().getSimpleName()); stringBuilder.append("." ); stringBuilder.append(method.getName()); stringBuilder.append("[" ); for (Object obj : objects) { stringBuilder.append(obj.toString()); } stringBuilder.append("]" ); return stringBuilder.toString(); }; } @Bean public CacheManager cacheManager (RedisConnectionFactory redisConnectionFactory) return new RedisCacheManager( RedisCacheWriter.nonLockingRedisCacheWriter(redisConnectionFactory), this .getRedisCacheConfigurationWithTtl(600 ), this .getRedisCacheConfigurationMap() ); } private Map<String, RedisCacheConfiguration> getRedisCacheConfigurationMap () Map<String, RedisCacheConfiguration> redisCacheConfigurationMap = new HashMap<>(); redisCacheConfigurationMap.put("UserInfoList" , this .getRedisCacheConfigurationWithTtl(3000 )); redisCacheConfigurationMap.put("UserInfoListAnother" , this .getRedisCacheConfigurationWithTtl(18000 )); return redisCacheConfigurationMap; } private RedisCacheConfiguration getRedisCacheConfigurationWithTtl (Integer seconds) Jackson2JsonRedisSerializer<Object> jackson2JsonRedisSerializer = new Jackson2JsonRedisSerializer<>(Object.class); ObjectMapper om = new ObjectMapper(); om.setVisibility(PropertyAccessor.ALL, JsonAutoDetect.Visibility.ANY); om.enableDefaultTyping(ObjectMapper.DefaultTyping.NON_FINAL); jackson2JsonRedisSerializer.setObjectMapper(om); RedisCacheConfiguration redisCacheConfiguration = RedisCacheConfiguration.defaultCacheConfig(); redisCacheConfiguration = redisCacheConfiguration.serializeValuesWith( RedisSerializationContext .SerializationPair .fromSerializer(jackson2JsonRedisSerializer) ).entryTtl(Duration.ofSeconds(seconds)); return redisCacheConfiguration; } } 过期时间 @Cacheable(value = "UserInfoList", keyGenerator = "simpleKeyGenerator") @Cacheable(value = "UserInfoListAnother", keyGenerator = "simpleKeyGenerator") @Cacheable(value = "DefaultKeyTest", keyGenerator = "simpleKeyGenerator")
在spring2.0前后差异
1 RedisCacheManager cacheManager = new RedisCacheManager(RedisTemplate redisTemplate);
after
1 RedisCacheManager cacheManager = new RedisCacheManager(RedisCacheWriter redisCacheWriter,RedisCacheConfiguration redisCacheConfiguration);
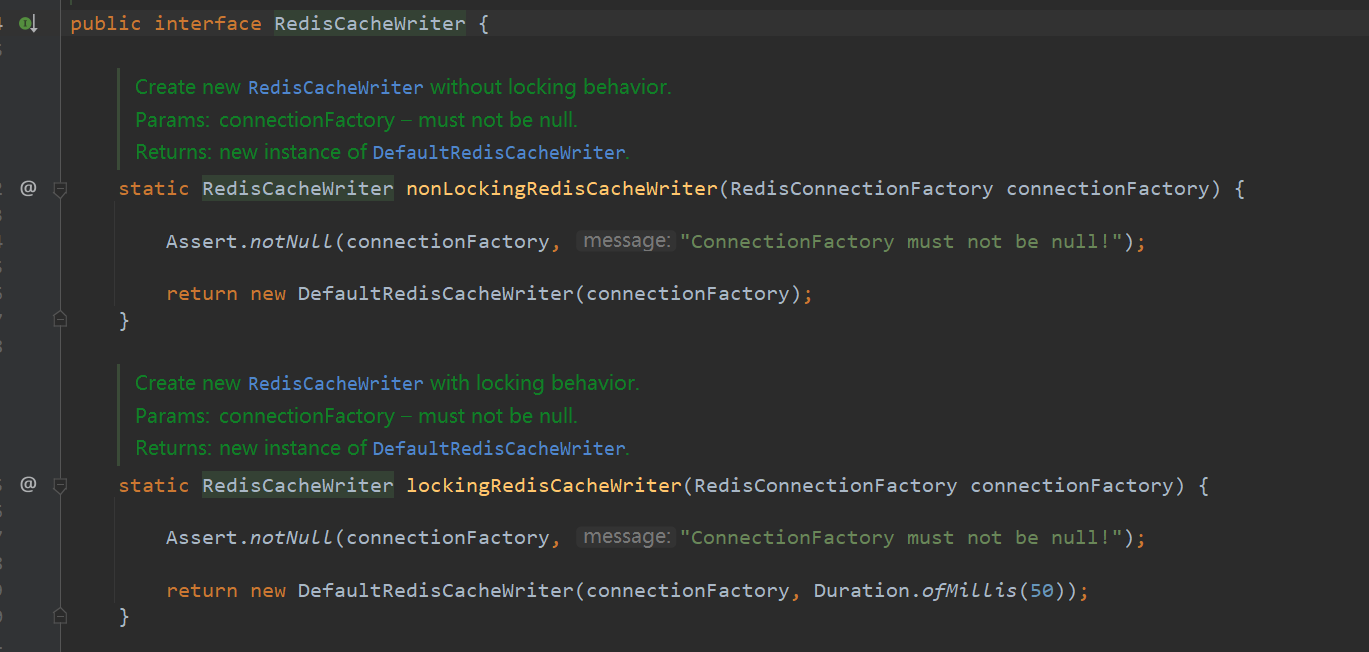
创建RedisCacheWriter分为有锁和无锁
1 2 3 4 5 6 7 8 9 10 11 12 13 14 15 16 17 18 19 static RedisCacheWriter nonLockingRedisCacheWriter (RedisConnectionFactory connectionFactory) Assert.notNull(connectionFactory, "ConnectionFactory must not be null!" ); return new DefaultRedisCacheWriter(connectionFactory); } JedisConnectionFactory static RedisCacheWriter lockingRedisCacheWriter (RedisConnectionFactory connectionFactory) Assert.notNull(connectionFactory, "ConnectionFactory must not be null!" ); return new DefaultRedisCacheWriter(connectionFactory, Duration.ofMillis(50 )); }
即使是同一个缓存CacheManager管理的缓存实例,配置有可能不一样。
1 2 .serializeKeysWith(RedisSerializationContext.SerializationPair.fromSerializer(keySerializer())) .serializeValuesWith(RedisSerializationContext.SerializationPair.fromSerializer(valueSerializer()))
JAVA序列化方式
1 2 3 4 5 6 static { CACHE_OPERATION_ANNOTATIONS.add(Cacheable.class); CACHE_OPERATION_ANNOTATIONS.add(CacheEvict.class); CACHE_OPERATION_ANNOTATIONS.add(CachePut.class); CACHE_OPERATION_ANNOTATIONS.add(Caching.class); }
解析注解的时候他们的入参,实现一模一样,只有返回值不一样,但是一模一样的代码写了三遍,为什么不判断类型动态返回呢~
1 2 3 4 5 6 7 8 9 10 11 12 13 14 15 16 17 18 19 20 21 22 23 24 25 26 27 28 29 30 31 32 33 34 35 36 37 38 39 40 41 42 43 44 45 46 47 48 49 50 51 52 53 54 55 56 57 58 59 60 61 62 63 64 65 66 67 68 69 70 71 72 73 74 75 76 77 78 79 80 81 82 83 84 85 86 87 88 89 90 91 92 93 94 95 96 97 98 99 100 101 102 103 104 105 106 107 @Nullable private Collection<CacheOperation> parseCacheAnnotations ( DefaultCacheConfig cachingConfig, AnnotatedElement ae, boolean localOnly) Collection<? extends Annotation> anns = (localOnly ? AnnotatedElementUtils.getAllMergedAnnotations(ae, CACHE_OPERATION_ANNOTATIONS) : AnnotatedElementUtils.findAllMergedAnnotations(ae, CACHE_OPERATION_ANNOTATIONS)); if (anns.isEmpty()) { return null ; } final Collection<CacheOperation> ops = new ArrayList<>(1 ); anns.stream().filter(ann -> ann instanceof Cacheable).forEach( ann -> ops.add(parseCacheableAnnotation(ae, cachingConfig, (Cacheable) ann))); anns.stream().filter(ann -> ann instanceof CacheEvict).forEach( ann -> ops.add(parseEvictAnnotation(ae, cachingConfig, (CacheEvict) ann))); anns.stream().filter(ann -> ann instanceof CachePut).forEach( ann -> ops.add(parsePutAnnotation(ae, cachingConfig, (CachePut) ann))); anns.stream().filter(ann -> ann instanceof Caching).forEach( ann -> parseCachingAnnotation(ae, cachingConfig, (Caching) ann, ops)); return ops; } private CacheableOperation parseCacheableAnnotation ( AnnotatedElement ae, DefaultCacheConfig defaultConfig, Cacheable cacheable) CacheableOperation.Builder builder = new CacheableOperation.Builder(); builder.setName(ae.toString()); builder.setCacheNames(cacheable.cacheNames()); builder.setCondition(cacheable.condition()); builder.setUnless(cacheable.unless()); builder.setKey(cacheable.key()); builder.setKeyGenerator(cacheable.keyGenerator()); builder.setCacheManager(cacheable.cacheManager()); builder.setCacheResolver(cacheable.cacheResolver()); builder.setSync(cacheable.sync()); defaultConfig.applyDefault(builder); CacheableOperation op = builder.build(); validateCacheOperation(ae, op); return op; } private CacheEvictOperation parseEvictAnnotation ( AnnotatedElement ae, DefaultCacheConfig defaultConfig, CacheEvict cacheEvict) CacheEvictOperation.Builder builder = new CacheEvictOperation.Builder(); builder.setName(ae.toString()); builder.setCacheNames(cacheEvict.cacheNames()); builder.setCondition(cacheEvict.condition()); builder.setKey(cacheEvict.key()); builder.setKeyGenerator(cacheEvict.keyGenerator()); builder.setCacheManager(cacheEvict.cacheManager()); builder.setCacheResolver(cacheEvict.cacheResolver()); builder.setCacheWide(cacheEvict.allEntries()); builder.setBeforeInvocation(cacheEvict.beforeInvocation()); defaultConfig.applyDefault(builder); CacheEvictOperation op = builder.build(); validateCacheOperation(ae, op); return op; } private CacheOperation parsePutAnnotation ( AnnotatedElement ae, DefaultCacheConfig defaultConfig, CachePut cachePut) CachePutOperation.Builder builder = new CachePutOperation.Builder(); builder.setName(ae.toString()); builder.setCacheNames(cachePut.cacheNames()); builder.setCondition(cachePut.condition()); builder.setUnless(cachePut.unless()); builder.setKey(cachePut.key()); builder.setKeyGenerator(cachePut.keyGenerator()); builder.setCacheManager(cachePut.cacheManager()); builder.setCacheResolver(cachePut.cacheResolver()); defaultConfig.applyDefault(builder); CachePutOperation op = builder.build(); validateCacheOperation(ae, op); return op; } private void parseCachingAnnotation ( AnnotatedElement ae, DefaultCacheConfig defaultConfig, Caching caching, Collection<CacheOperation> ops) Cacheable[] cacheables = caching.cacheable(); for (Cacheable cacheable : cacheables) { ops.add(parseCacheableAnnotation(ae, defaultConfig, cacheable)); } CacheEvict[] cacheEvicts = caching.evict(); for (CacheEvict cacheEvict : cacheEvicts) { ops.add(parseEvictAnnotation(ae, defaultConfig, cacheEvict)); } CachePut[] cachePuts = caching.put(); for (CachePut cachePut : cachePuts) { ops.add(parsePutAnnotation(ae, defaultConfig, cachePut)); } }
JSR(JCP Java Community Process)文档查询地址,例如JSR107规范,servlet规范等等,
1 https://www.docs4dev.com/docs/zh/spring-framework/5.1.3.RELEASE/reference/web.html
以及各类中文版在线开发文档
对了本次的主题虽然是Servlet,但不全是Servlet,都是用servlet带出来的,比如现在
1 2 3 4 5 6 7 8 9 10 11 12 13 14 15 16 17 18 19 20 public DynamicThreadPoolExecutor (int corePoolSize, int maximumPoolSize, long keepAliveTime, TimeUnit unit, boolean waitForTasksToCompleteOnShutdown, long awaitTerminationMillis, @NonNull BlockingQueue<Runnable> workQueue, @NonNull String threadPoolId, @NonNull ThreadFactory threadFactory, @NonNull RejectedExecutionHandler handler) super (corePoolSize, maximumPoolSize, keepAliveTime, unit, waitForTasksToCompleteOnShutdown, awaitTerminationMillis, workQueue, threadPoolId, threadFactory, handler); this .threadPoolId = threadPoolId; RejectedExecutionHandler rejectedProxy = (RejectedExecutionHandler) Proxy .newProxyInstance( handler.getClass().getClassLoader(), new Class[]{RejectedExecutionHandler.class}, new RejectedProxyInvocationHandler(handler, rejectCount)); setRejectedExecutionHandler(rejectedProxy); }
mybatis动态代理
1 2 3 4 5 6 7 8 9 10 11 protected T newInstance (MapperProxy<T> mapperProxy) return (T) Proxy.newProxyInstance(mapperInterface.getClassLoader(), new Class[] { mapperInterface }, mapperProxy); } public T newInstance (SqlSession sqlSession) final MapperProxy<T> mapperProxy = new MapperProxy<>(sqlSession, mapperInterface, methodCache); return newInstance(mapperProxy); }
问题: 一个接口方法,返回值相同,方法相同,参数为Person,现在有子类PersonMan和PersonWoman,如何对接口进行适配?
1 2 3 4 5 6 7 8 9 10 11 12 13 14 15 16 17 18 public class Person private String name; private Integer age; } public class PersonMan extends Person private String character; } public class PersonWoman extends Person private String constellation; }
在泛型类型中支持class等,以及省去参数转换的上界通配符<? extends E>:上界通配符,表明参数化类型可能是所指定的类型,或者此类型的子类;
1 2 3 4 5 6 7 8 9 10 11 12 13 14 15 16 17 18 19 20 21 22 23 24 25 26 27 28 29 30 31 32 33 34 35 36 37 38 39 40 public enum ElementType TYPE, FIELD, METHOD, PARAMETER, CONSTRUCTOR, LOCAL_VARIABLE, ANNOTATION_TYPE, PACKAGE, TYPE_PARAMETER, TYPE_USE }
如下
1 2 3 4 5 6 7 8 9 10 11 12 13 14 15 16 17 18 19 20 21 22 23 24 25 26 27 28 29 30 public interface PersonService { public void queryPerson(List<? extends Person> list); } @Service public class PersonServiceImpl implements PersonService{ @Override public void queryPerson(List<? extends Person> list) { System.out.println(JSONObject.toJSONString(list)); } } List<Person> list = new ArrayList<>(); //List<PersonMan> list = new ArrayList<>(); //List<PersonWoman> list = new ArrayList<>(); personService.queryPerson(list);
那么如果参数类型为注解呢?
1 2 3 4 5 6 @Override public void queryPerson (List<? extends Person> list,Class<? extends Annotation> t) System.out.println(JSONObject.toJSONString(list)); System.out.println(cast.annotationType()); }
那么为什么上面的parsePutAnnotation不用呢?
1 2 3 4 5 6 7 8 private static final Set<Class<? extends Annotation>> CACHE_OPERATION_ANNOTATIONS = new LinkedHashSet<>(8); static { CACHE_OPERATION_ANNOTATIONS.add(Cacheable.class); CACHE_OPERATION_ANNOTATIONS.add(CacheEvict.class); CACHE_OPERATION_ANNOTATIONS.add(CachePut.class); CACHE_OPERATION_ANNOTATIONS.add(Caching.class); }
其实我就是看他的写的emoj,而且在caching这个注解里他包含了4种注解,然后统一进行管理的。
插播:Dbeaver中普通操作都会,安利一个类似idea的快捷键功能,Template—>SQL编辑器中可设置常用SQL,快捷键加Tab唤出.
国际化包含文本的国际化和时区的国际化 @Repository VS @NoRepositoryBean 回到cache相关中,在开启缓存时提示错误需要加入@Enablecahing注解,而在验证缓存注解时,在接口加了NoRepositoryBean,那么NoRepositoryBean又是什么?跟@Repository有何不同?
JMS(java message service)JSR-914 1.JMS:用于应用程序之间,或在分布式系统中发送消息。而一些生产者,消费者,消息等不是消息队列的特指,而是JMS的所有特性。
3.kafka? 零拷贝? 哎嗨,重点来了 官网:https://kafka.apache.org/
默认分区内存大小32M,每个批次大小是16K
1 2 3 4 5 6 1. 配置2. 连接集群3. 指定序列化类型4. 创建生产者5. 发送数据6. 关闭资源
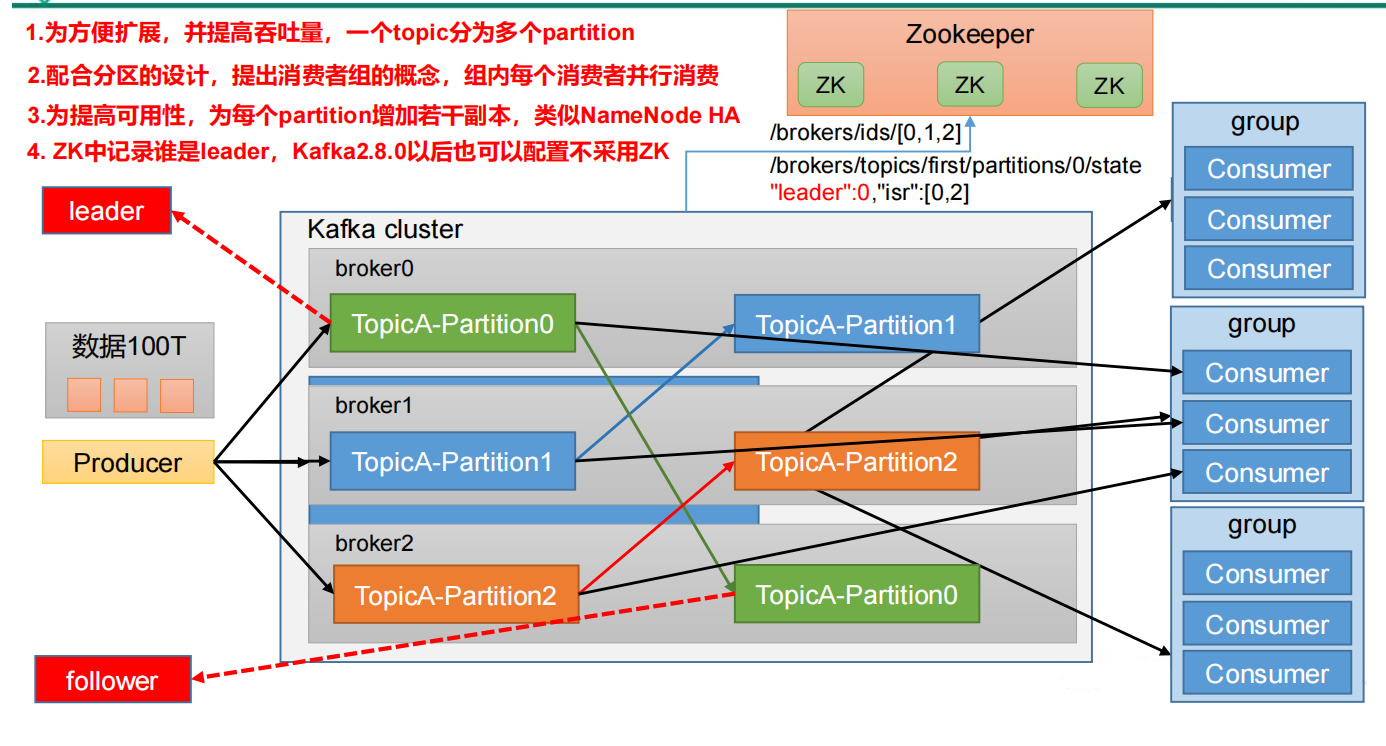
分区自定义,合理使用资源,负载均衡 ACK级别设置为1 +分区副本大于等于2 +ISR应答最小副本数量大于等于2
1、brokerid
AR:是kafka中你那个所有分区副本的总称 ISR:leader和follower之间正常通讯的节点
DMA
零拷贝有两种方式:mmap/sendfile,而直接内存的方式跟Netty也是如出一辙。
源码阅读 1 2 3 4 5 6 7 8 9 10 11 12 13 org.apache.kafka.clients.producer.ProducerRecord 可指定主题 private final String topic; 分区 private final Integer partition; 头信息 private final Headers headers; key private final K key; value private final V value; linger.ms private final Long timestamp;
构造器有几种,对于发送消息就有几种类型,consumerRecord同理,key和value需要指定序列化类。
1 .define(BATCH_SIZE_CONFIG, Type.INT, 16384, atLeast(0), Importance.MEDIUM, BATCH_SIZE_DOC)
16384/1024=16k
1 .define(LINGER_MS_CONFIG, Type.LONG, 0, atLeast(0), Importance.MEDIUM, LINGER_MS_DOC)
key指定的序列化类为
1 2 Serializer class for key that implements the <code>org.apache.kafka.common.serialization.Serializer</code> interface. 如果在配置文件中指定则需要全限定类名
zookeeper中存放的信息 broker启动后在zookeeper中注册
Linux新增知识点 kafka 搭配 xcall jps ,查看集群下机器节点
kafka服务器挂了怎么办? 1.先尝试重启,重启成功直接解决
Broker中的重要参数
参数名称
Description
replica.lag.time.max.ms
ISR 中,如果 Follower 长时间未向 Leader 发送通信请求或同步数据,则该 Follower 将被踢出 ISR。该时间阈值,默认30s 。
auto.leader.rebalance.enable
默认是 true 。 自动 Leader Partition 平衡。
leader.imbalance.per.broker.percentage
默认是 10% 。每个 broker 允许的不平衡的 leader的比率。如果每个 broker 超过了这个值,控制器会触发 leader 的平衡。
leader.imbalance.check.interval.seconds
认值 300 秒 。检查 leader 负载是否平衡的间隔时间。
log.segment.bytes
Kafka 中 log 日志是分成一块块存储的,此配置是指 log 日志划分 成块的大小,默认值 1G 。
log.index.interval.bytes
默认 4kb ,kafka 里面每当写入了 4kb 大小的日志(.log),然后就往 index 文件里面记录一个索引
log.retention.hours
Kafka 中数据保存的时间,默认7天 。
log.retention.minutes
Kafka 中数据保存的时间,分钟级别,默认关闭 。
文件清理策略 Kafka 中默认的日志保存时间为7天 。

